Deploying Snowclone to Your Cloud
The goal for deploying Snowclone to a user’s cloud was simple: to provide the full Snowclone stack, but hosted in Amazon Web Services (AWS). While Snowclone run locally is meant for one application, Snowclone deployed to AWS is intended to host multiple backends. The deployment to AWS is a turnkey solution handled by Snowclone CLI.
We chose AWS because it is the industry leader in cloud computing. The strategic decisions we made apply to any cloud platform, only the implementation details will vary.
The workflow is as follows: a Snowclone user, via the Snowclone CLI, deploys a backend to their own AWS environment. That backend is then made available at a URL for connection over the internet, with specific functionalities like real-time, schema migration, and CRUD operations available through associated API endpoints of the backend’s URL. A user can deploy many backends, all managed by the CLI.
In the sections below, we will go through each component of a backend’s AWS infrastructure, and discuss the challenges encountered when deploying them. This will culminate with a discussion on the complete architecture, and how we used Snowclone CLI in conjunction with the tool Terraform to provision our solution.
Compute
We considered a few AWS offerings for our compute model, but chose Elastic Container Service (ECS) Fargate:
- Elastic Container Service (ECS) Fargate: Since our entire stack is containerized, we chose to deploy it to ECS, a container orchestration service. ECS has options for “capacity”, the infrastructure where containers run, with the relevant two capacity options for our use case being EC2 and Fargate. EC2 required specifying the size and quantity of, and managing, the underlying EC2 instances. We chose to deploy with Fargate to take advantage of its serverless pay-only-for-what-you-use model and ensure that Snowclone users would not be responsible for managing servers.
Alternatives we considered:
- Elastic Cloud Compute (EC2): The easiest and most straightforward option for deployment was to host our entire stack in an EC2 instance. However, EC2 is expensive and inflexible compared to Elastic Container Service, so one might end up paying for more than is used.
- Lambda: These short-lived compute instances are cost-effective, but our tasks need to be long-running since we have an event server that needs to keep SSE connections alive and a PostgREST server whose caching mechanisms are rendered useless with a Lambda.
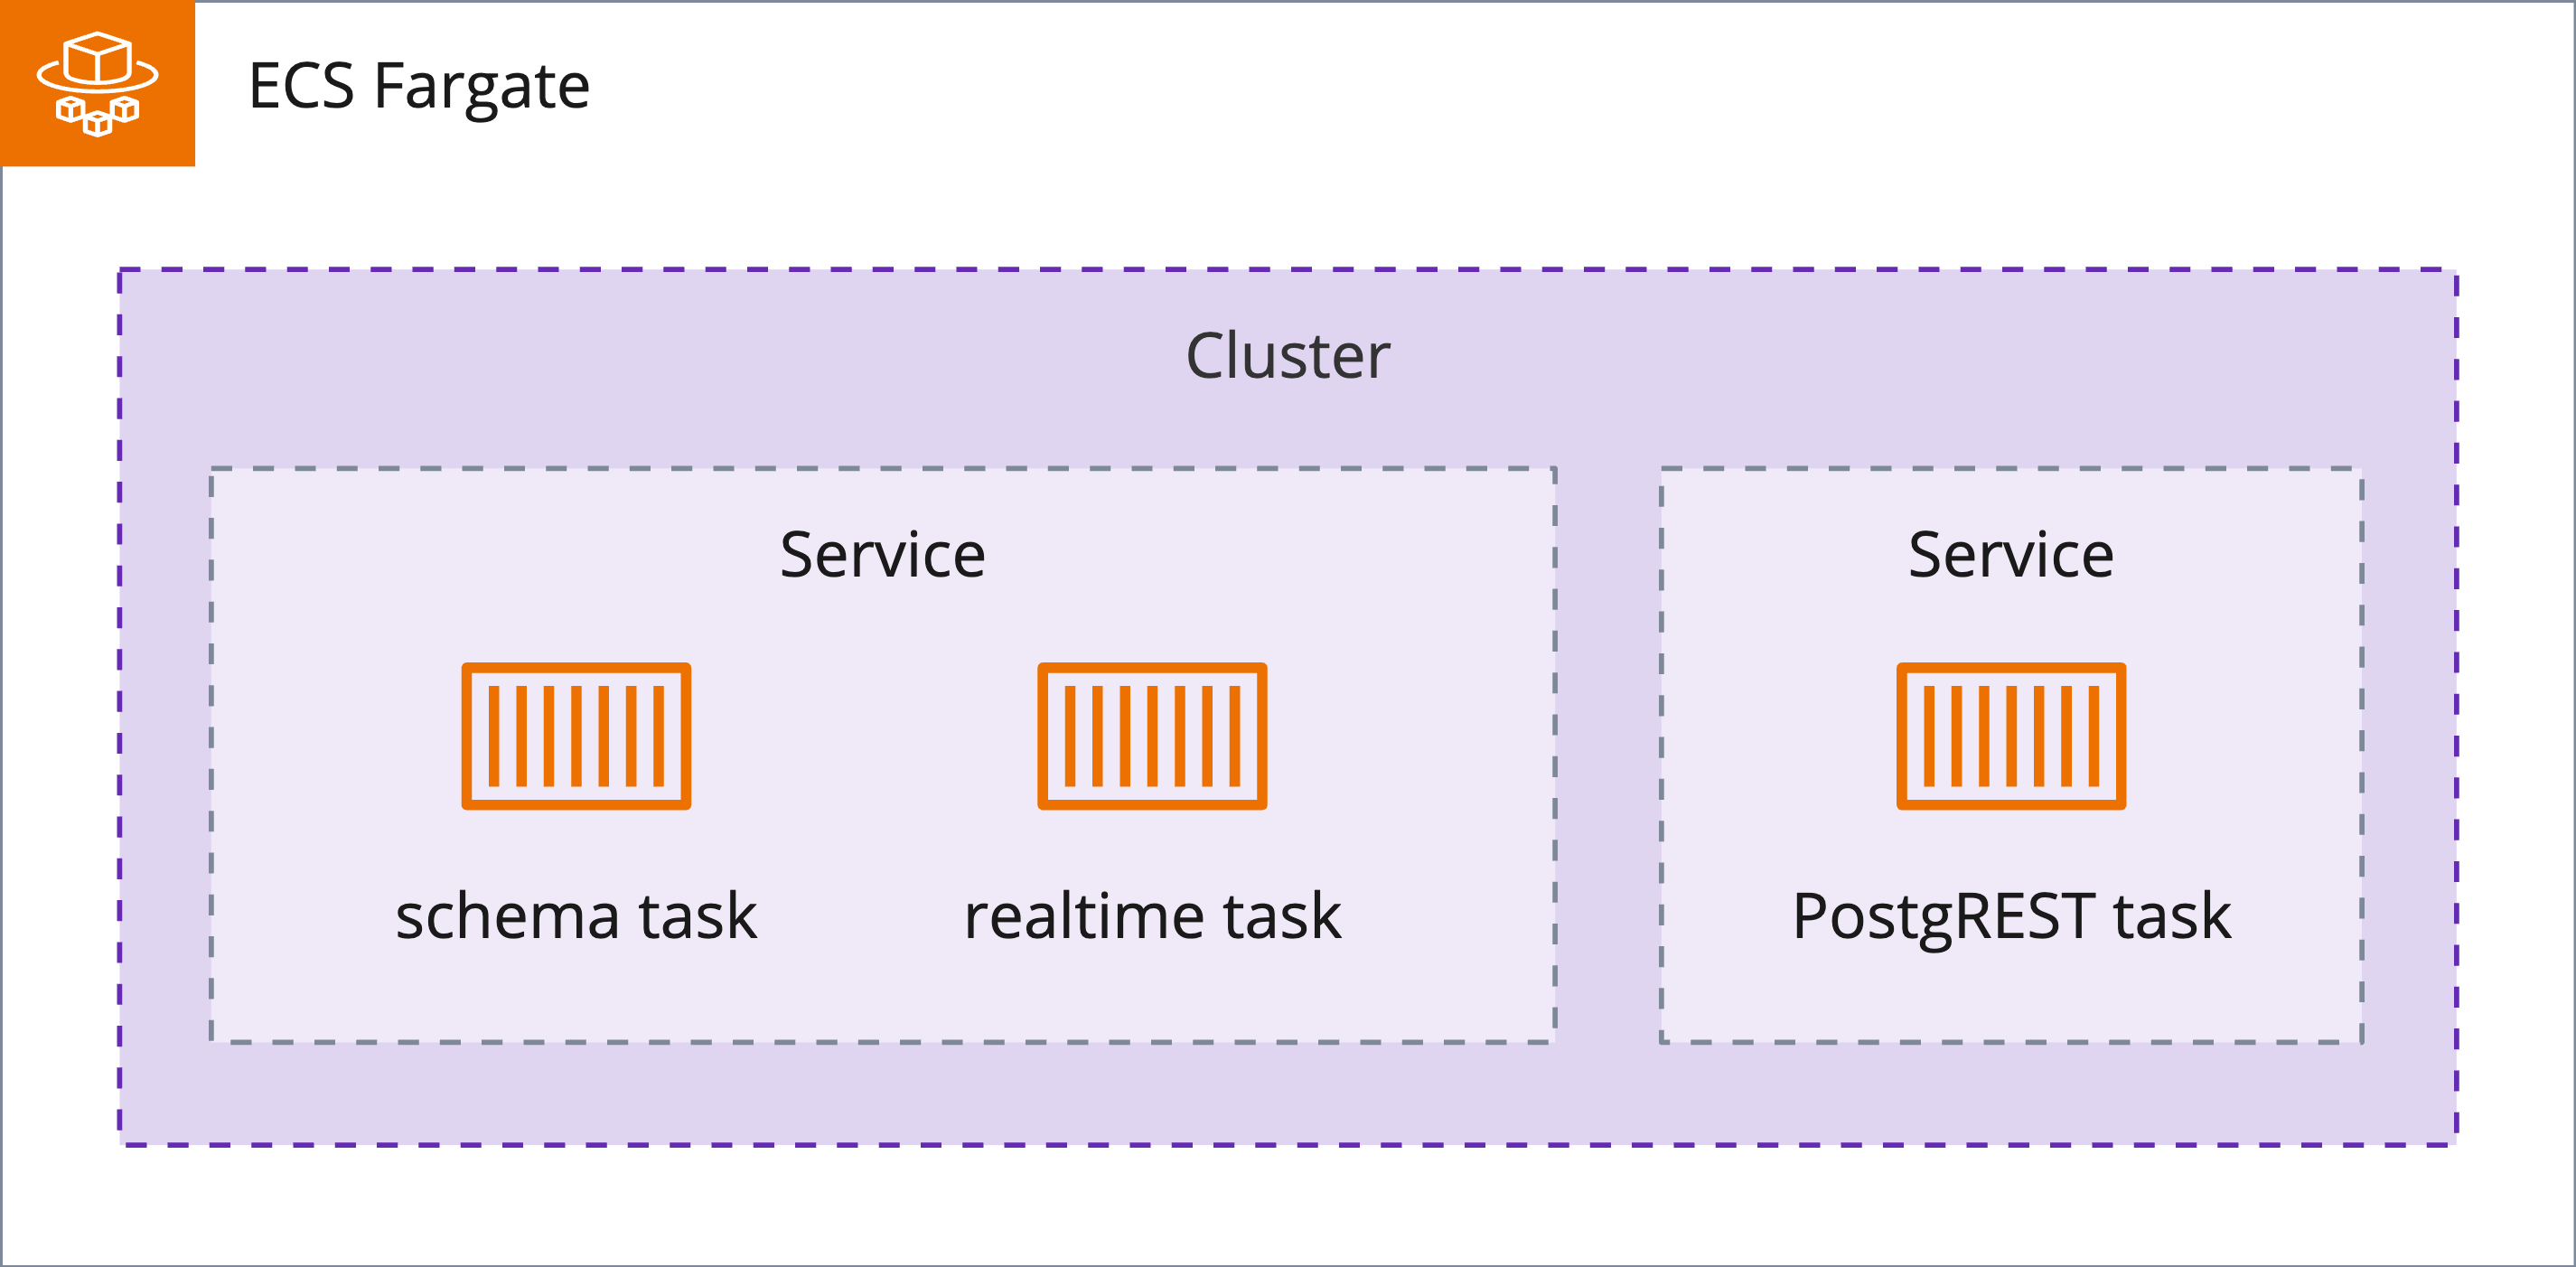
Structure of services: In ECS, a task equates to a container, a unit of code along with its dependencies. A task can be standalone or run by a service; a service handles a task’s lifecycle. To use Fargate capacity in ECS, we first provision a cluster to group our services. A service can spin up more tasks when traffic is high, remove those tasks when traffic decreases, and replace unhealthy tasks.
Each task requires a task definition (analogous to the service definitions used locally in docker-compose to specify configuration details for containers like port mapping, etc.) which, among other configuration details, includes a reference to the Docker image that will be pulled down from Docker hub upon the task being provisioned and used to hydrate the task.
One challenge we encountered when provisioning Snowclone’s API servers was handling environment variables.
When Snowclone is run locally, these variables could be safely stored in a separate .env file
and referenced
in our docker-compose file. However, for AWS, these values needed to be defined in our ECS task definitions,
and transmitting these plain text values over the network was unacceptable from a security perspective.
AWS Secrets Manager proved a useful solution. This process will be more thoroughly covered in later sections, but broadly speaking: when a user deploys a new backend with Snowclone, a temporary password and username are generated for the database. Snowclone then supplies this password and username to our infrastructure provisioning tool, Terraform, which registers the value as a secret in AWS Secrets Manager. Sensitive data is thus stored in Secrets Manager and then referenced and retrieved in our task definitions without hardcoding plain text values.
Database
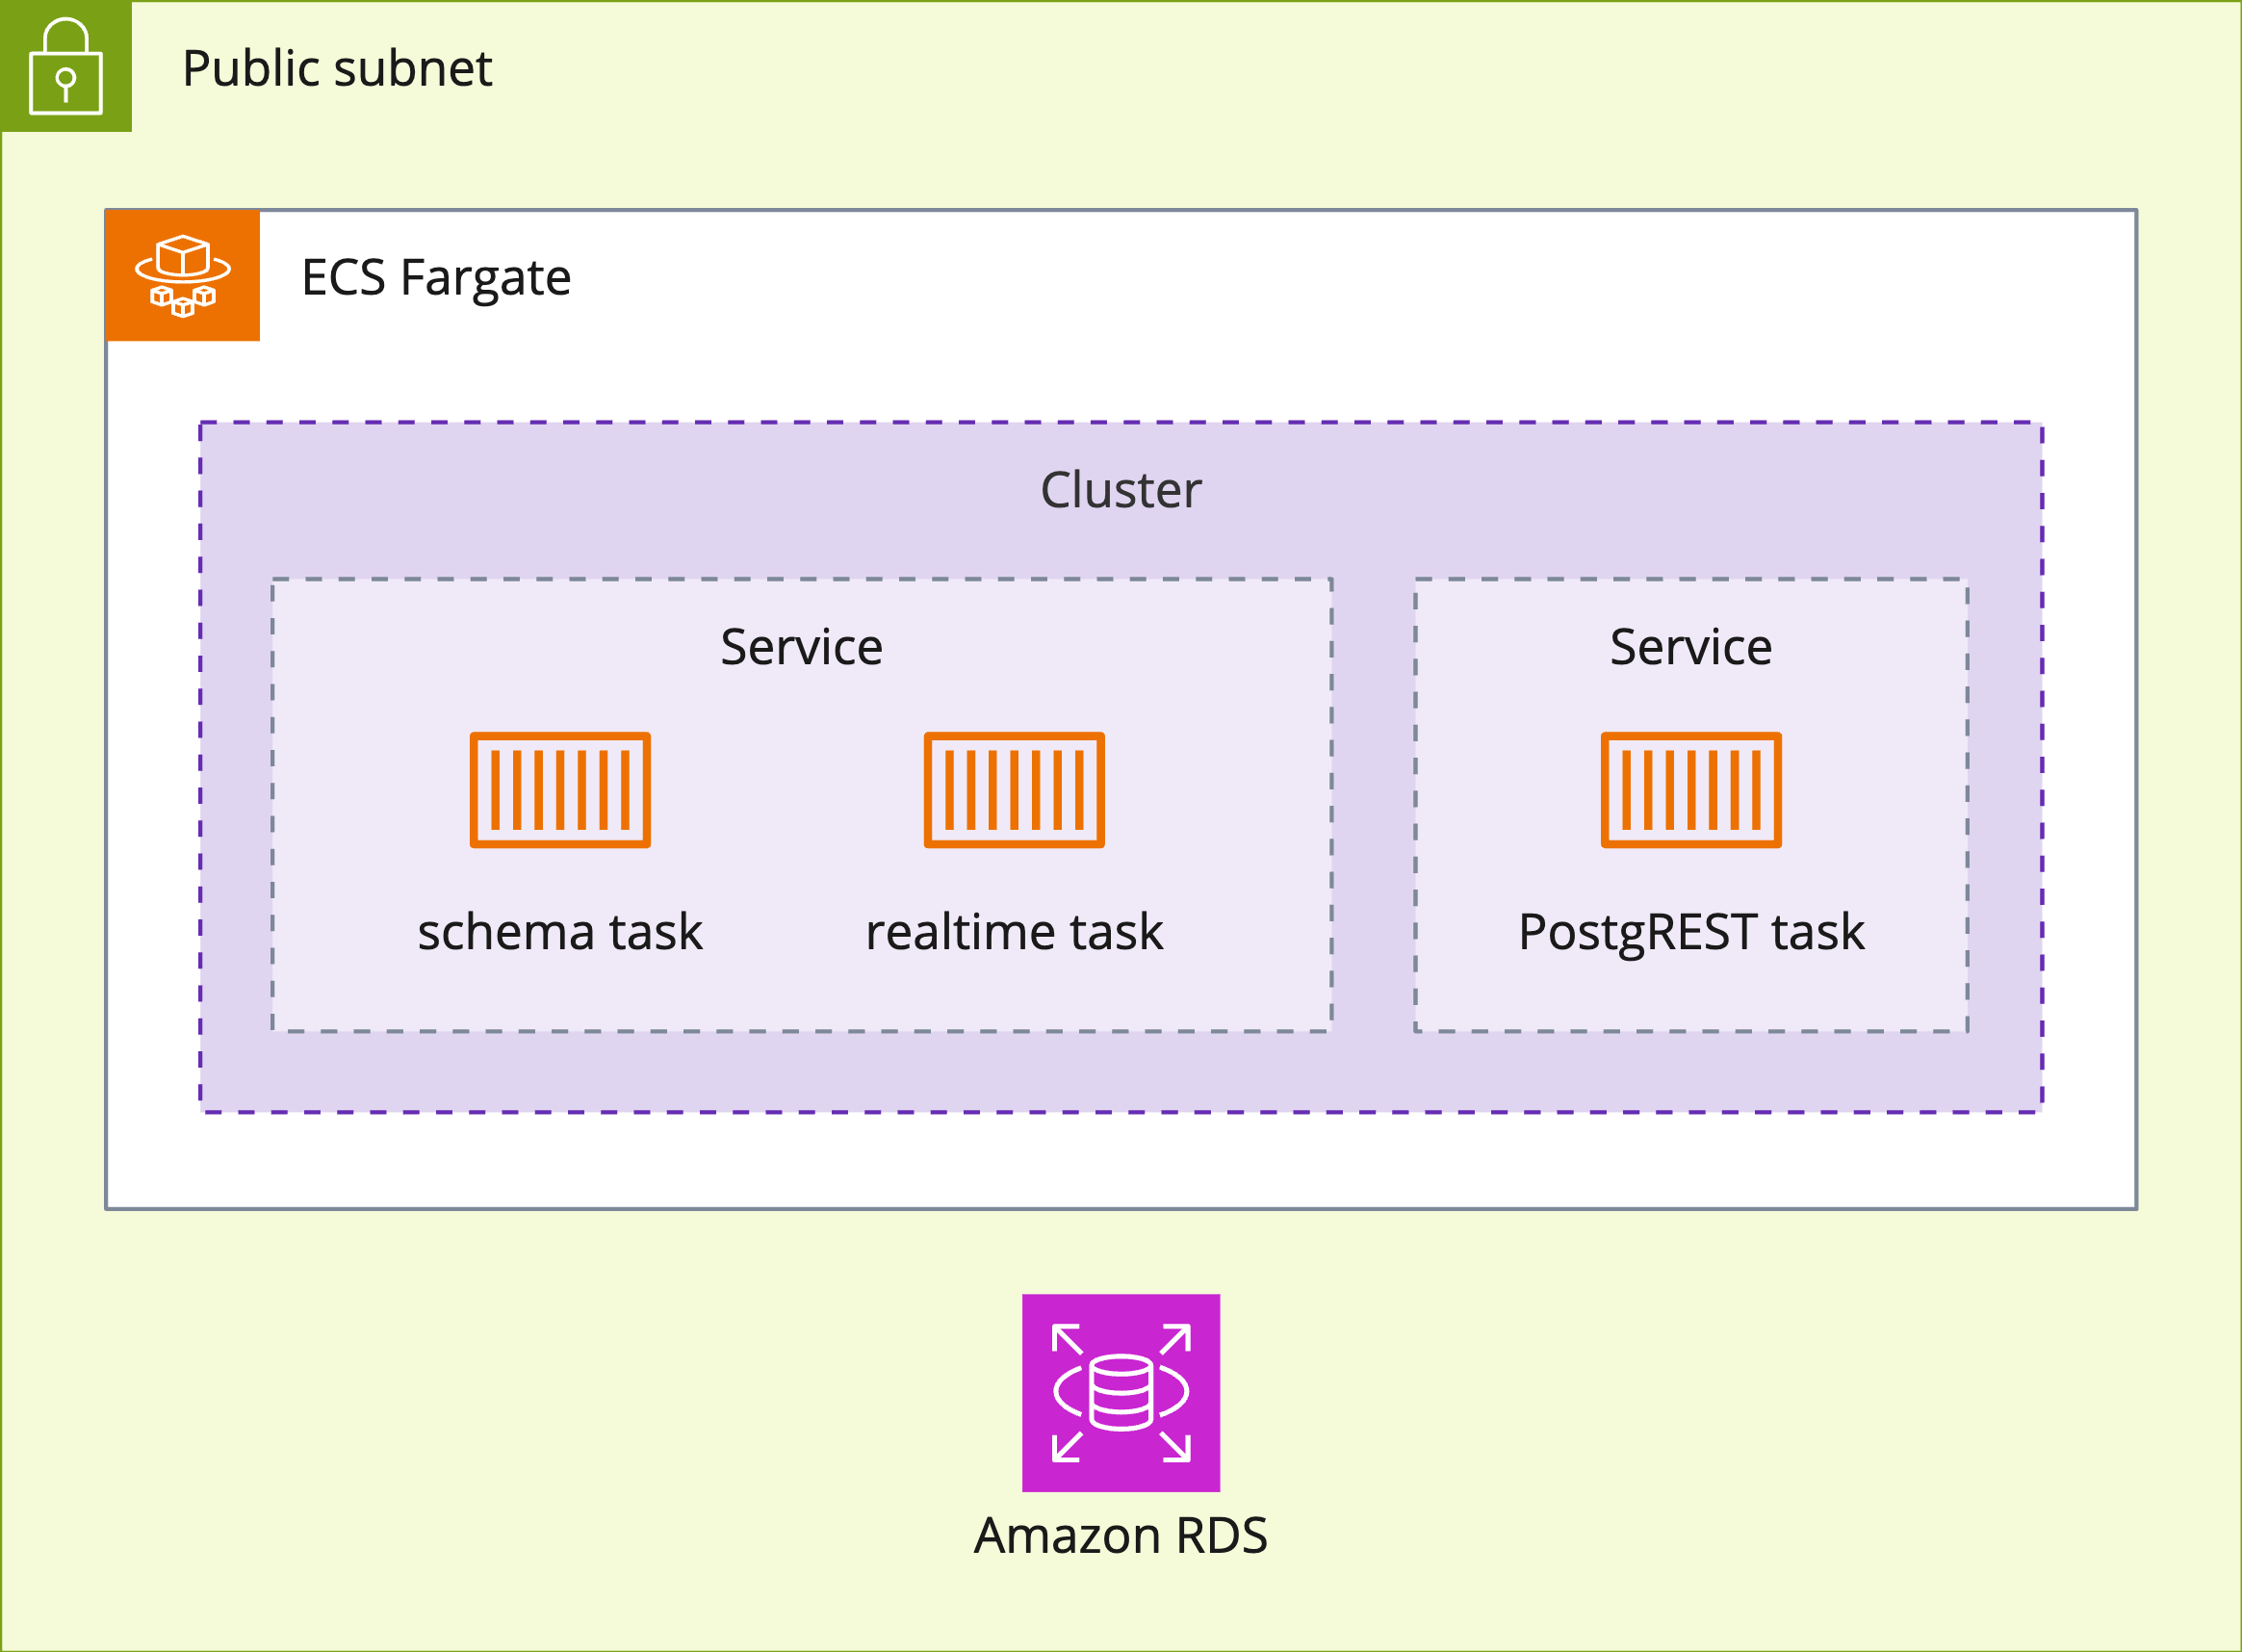
When Snowclone is run locally, the database is a PostgreSQL instance running in a Docker container. To recreate this functionality in AWS, and since we were already using ECS Fargate, the thought of spinning up a Fargate service running a PostgreSQL task seemed like a possible solution.
However, persisting the database’s data in ECS is a tricky challenge. By design, containers in ECS are ephemeral resources, their life cycles dependent on the actual Amazon servers hosting them— servers that can be rebooted or shut down anytime. To overcome this issue, our data had to be written somewhere that outlived the container’s life cycle.
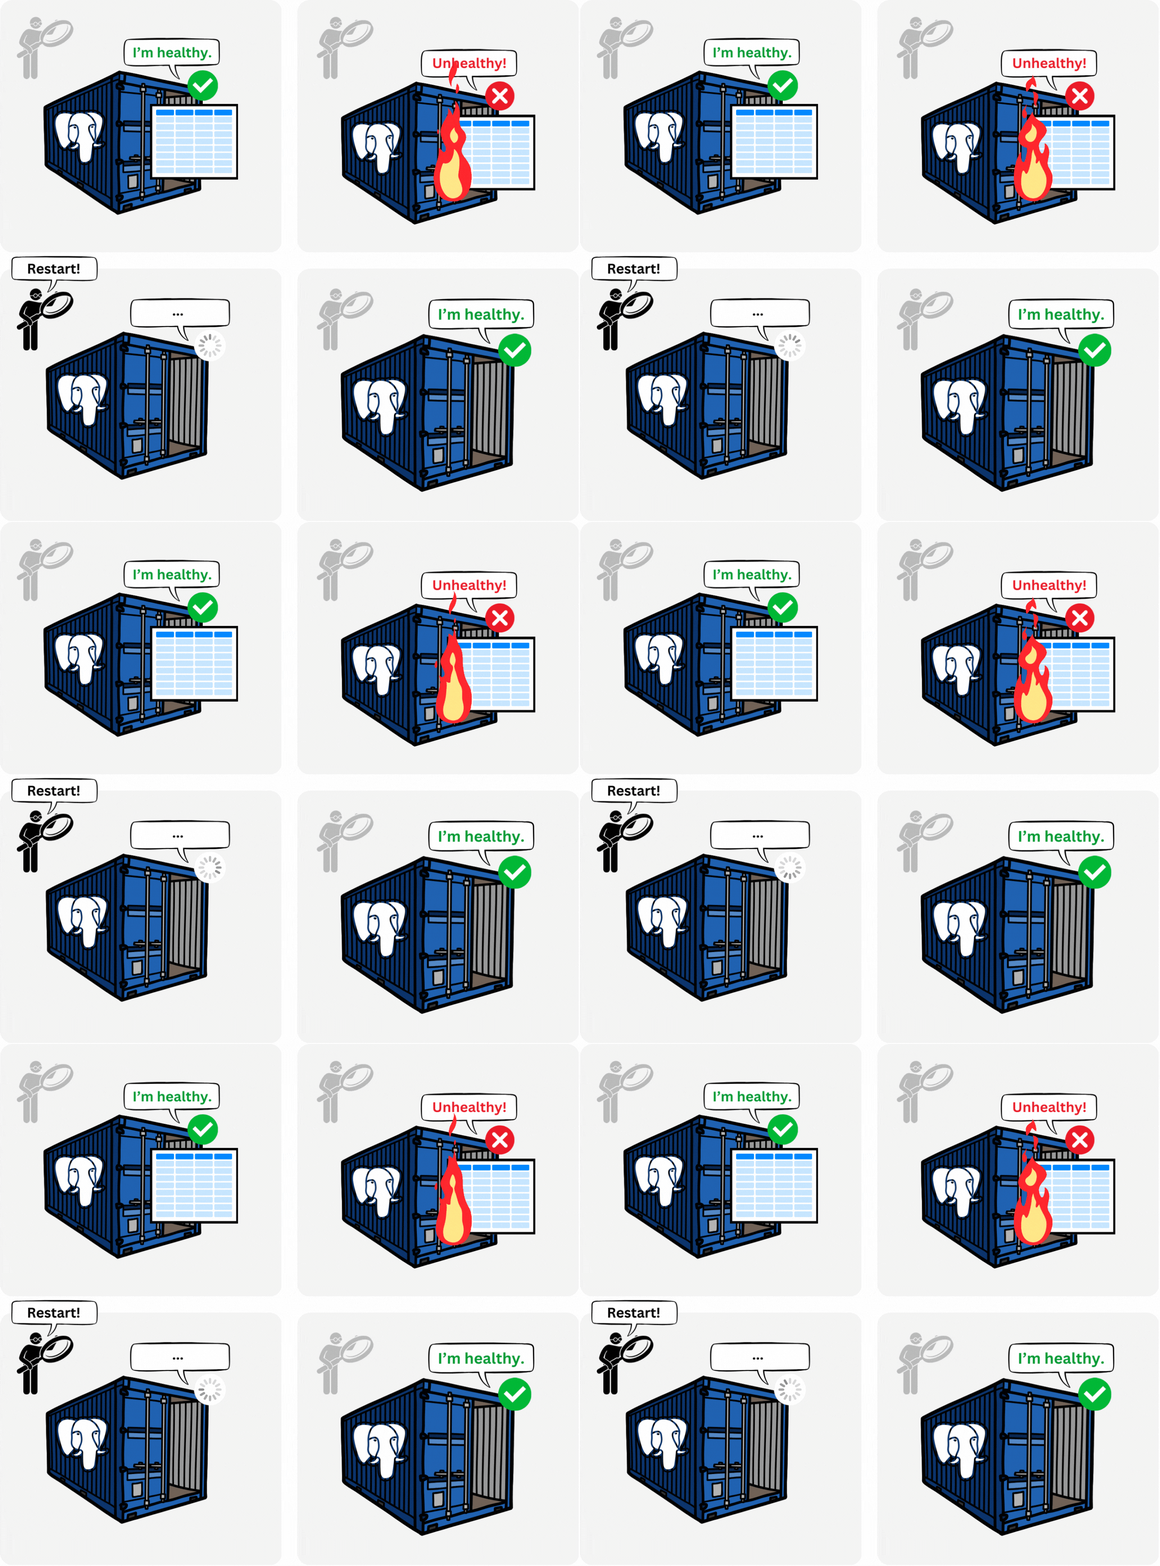
In a local instance of Snowclone, Docker persists data using volumes stored on the local machine. Thus, if the database container is shut down, the data can be accessed by the container when it restarts. This Docker volume approach does not work in ECS Fargate, as no local host outlives the container.2
Our need for data persistence led us to use Amazon’s Relational Database Service (RDS) for our PostgreSQL database.
Data Access Control
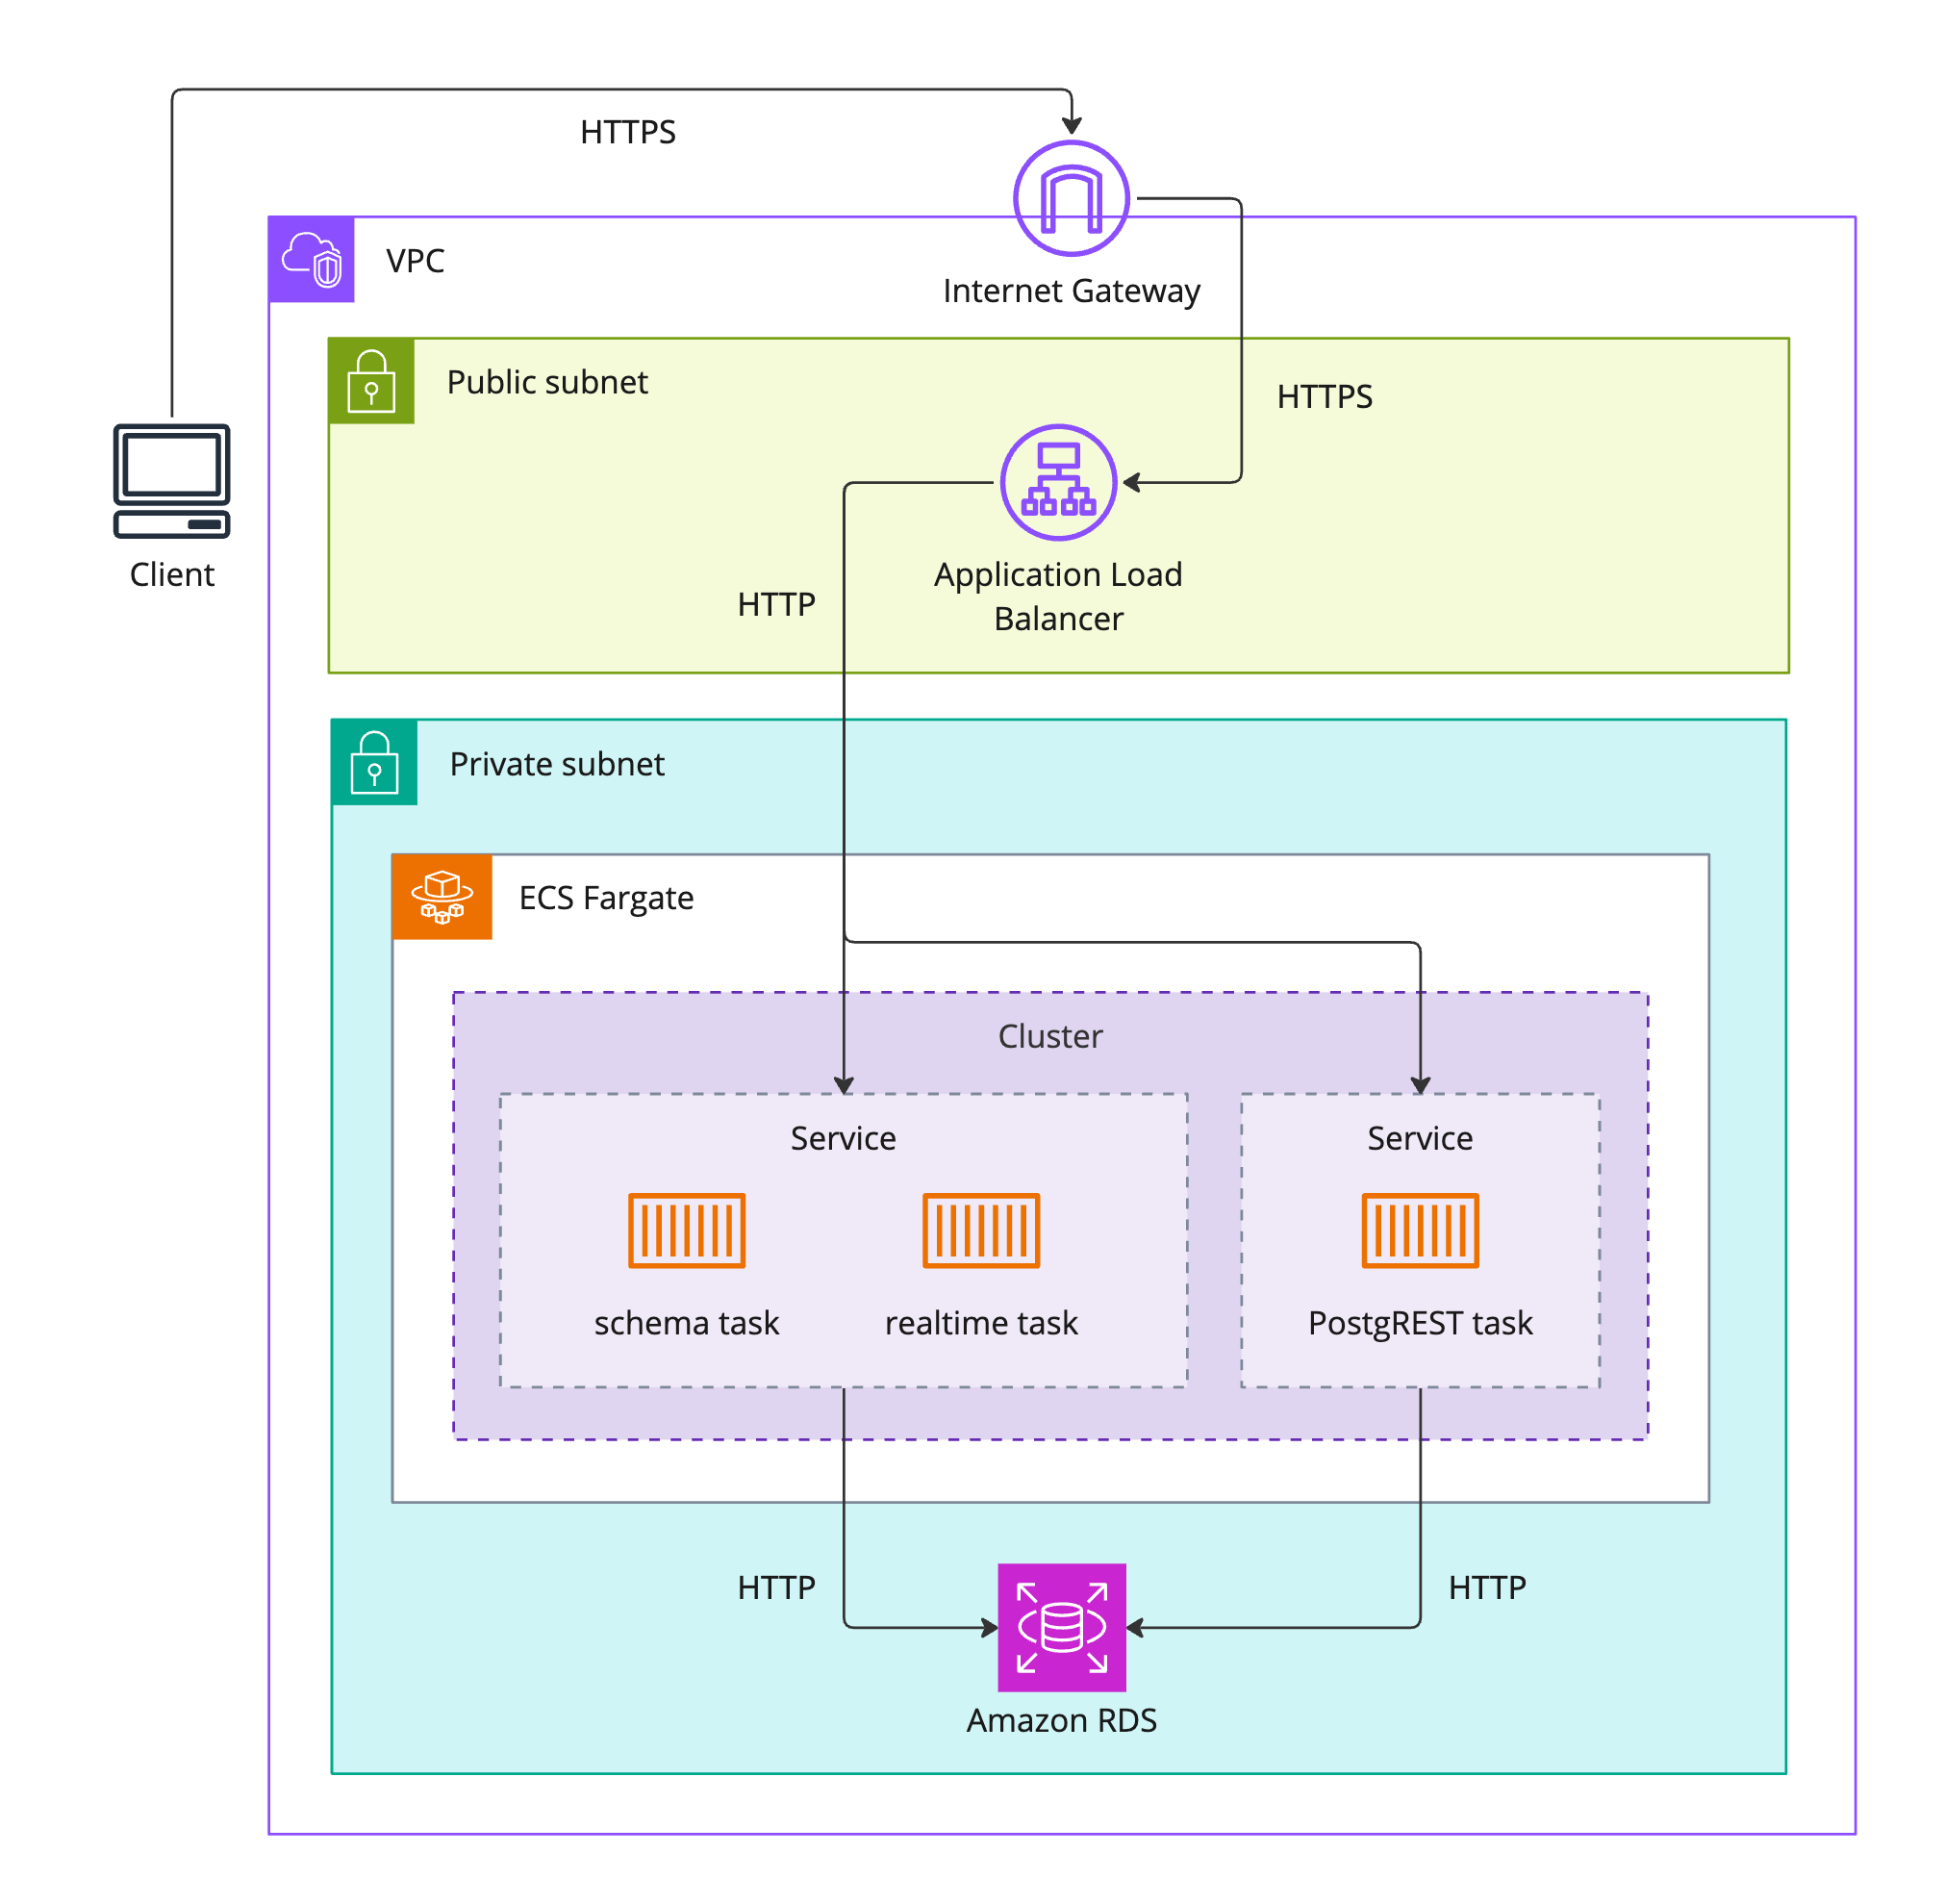
To control access to the backend hosted on AWS, we wanted our database and API services running on ECS to be in a private subnet, with only the application load balancer (ALB) remaining in a public subnet.3 That way, a backend’s only entry point from the internet would be through its ALB. The ALB handles routing requests to the appropriate service based on the URL path of the incoming request (i.e. ”/realtime”, “/schema”, or “/[tableName]” for CRUD requests to the postgREST API).4
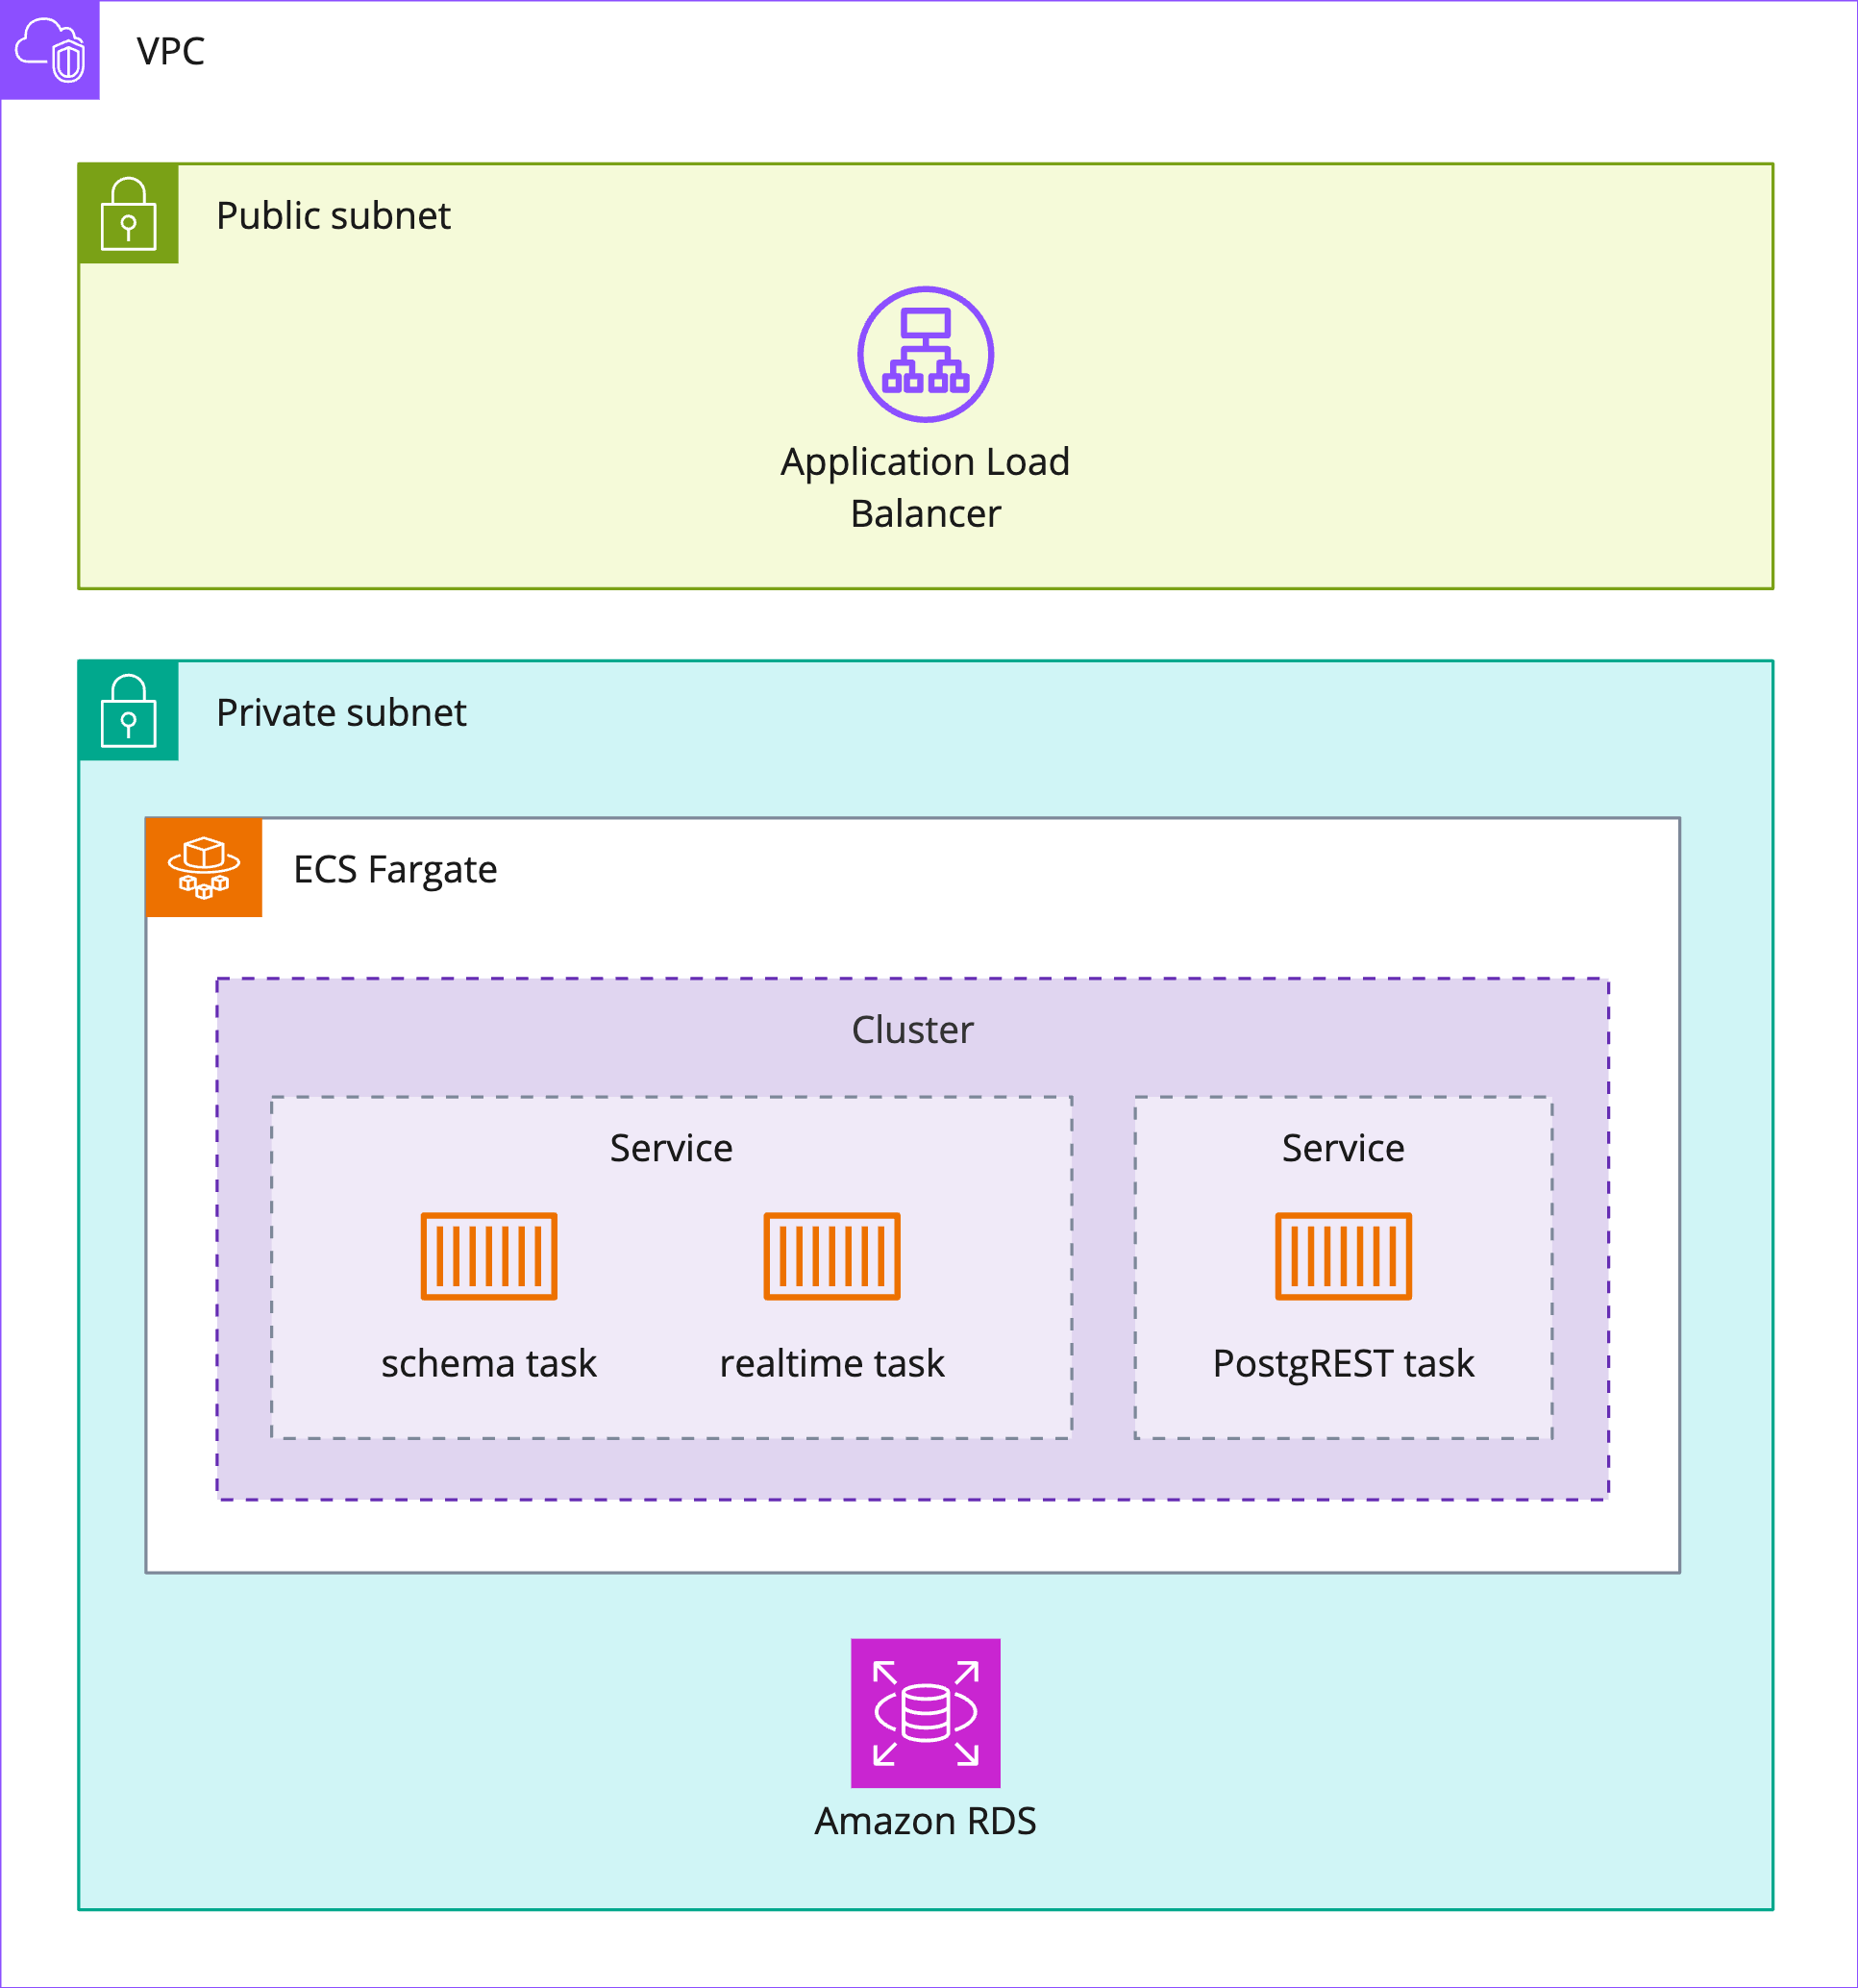
“Inside” a backend (with “outside” being the public internet), the ALB can talk to the API services, but there is no direct access from the public internet to the API services or the database. Furthermore, only the API services can talk to the database, and the database can only talk to those API services. This lockdown of communications was achieved via AWS security groups. Security groups can be thought of as virtual firewalls for each AWS resource deployed in one’s VPC, as they control the ingress and egress of traffic to that resource. Security groups also allow multiple backends to exist on the same private subnet. Each backend has its own security groups; thus the API servers for Backend-A can only talk to the database for Backend-A, not Backend-B.
However, we ran into an issue with our API services once we placed them on a private subnet: our Docker images were hosted on Docker Hub, but without internet access, our tasks could not pull down from Docker Hub. This lack of internet access also prevented tasks from connecting to AWS CloudWatch for logs5 and AWS Secrets Manager for secret environment variables.
NAT to the Rescue
We fixed this using a NAT (network address translation) gateway to route internet traffic from our private subnet. NATs provide “a way to map multiple private addresses inside a local network to a public IP address before transferring the information onto the internet.” The NAT is placed in the public subnet, and the route table for our private subnet is configured to send any non-local requests to the NAT. Containers could now send outbound requests to the internet (e.g. Docker Hub), but inbound traffic through the NAT and into the private subnet is locked down, with only responses to the containers's requests allowed.
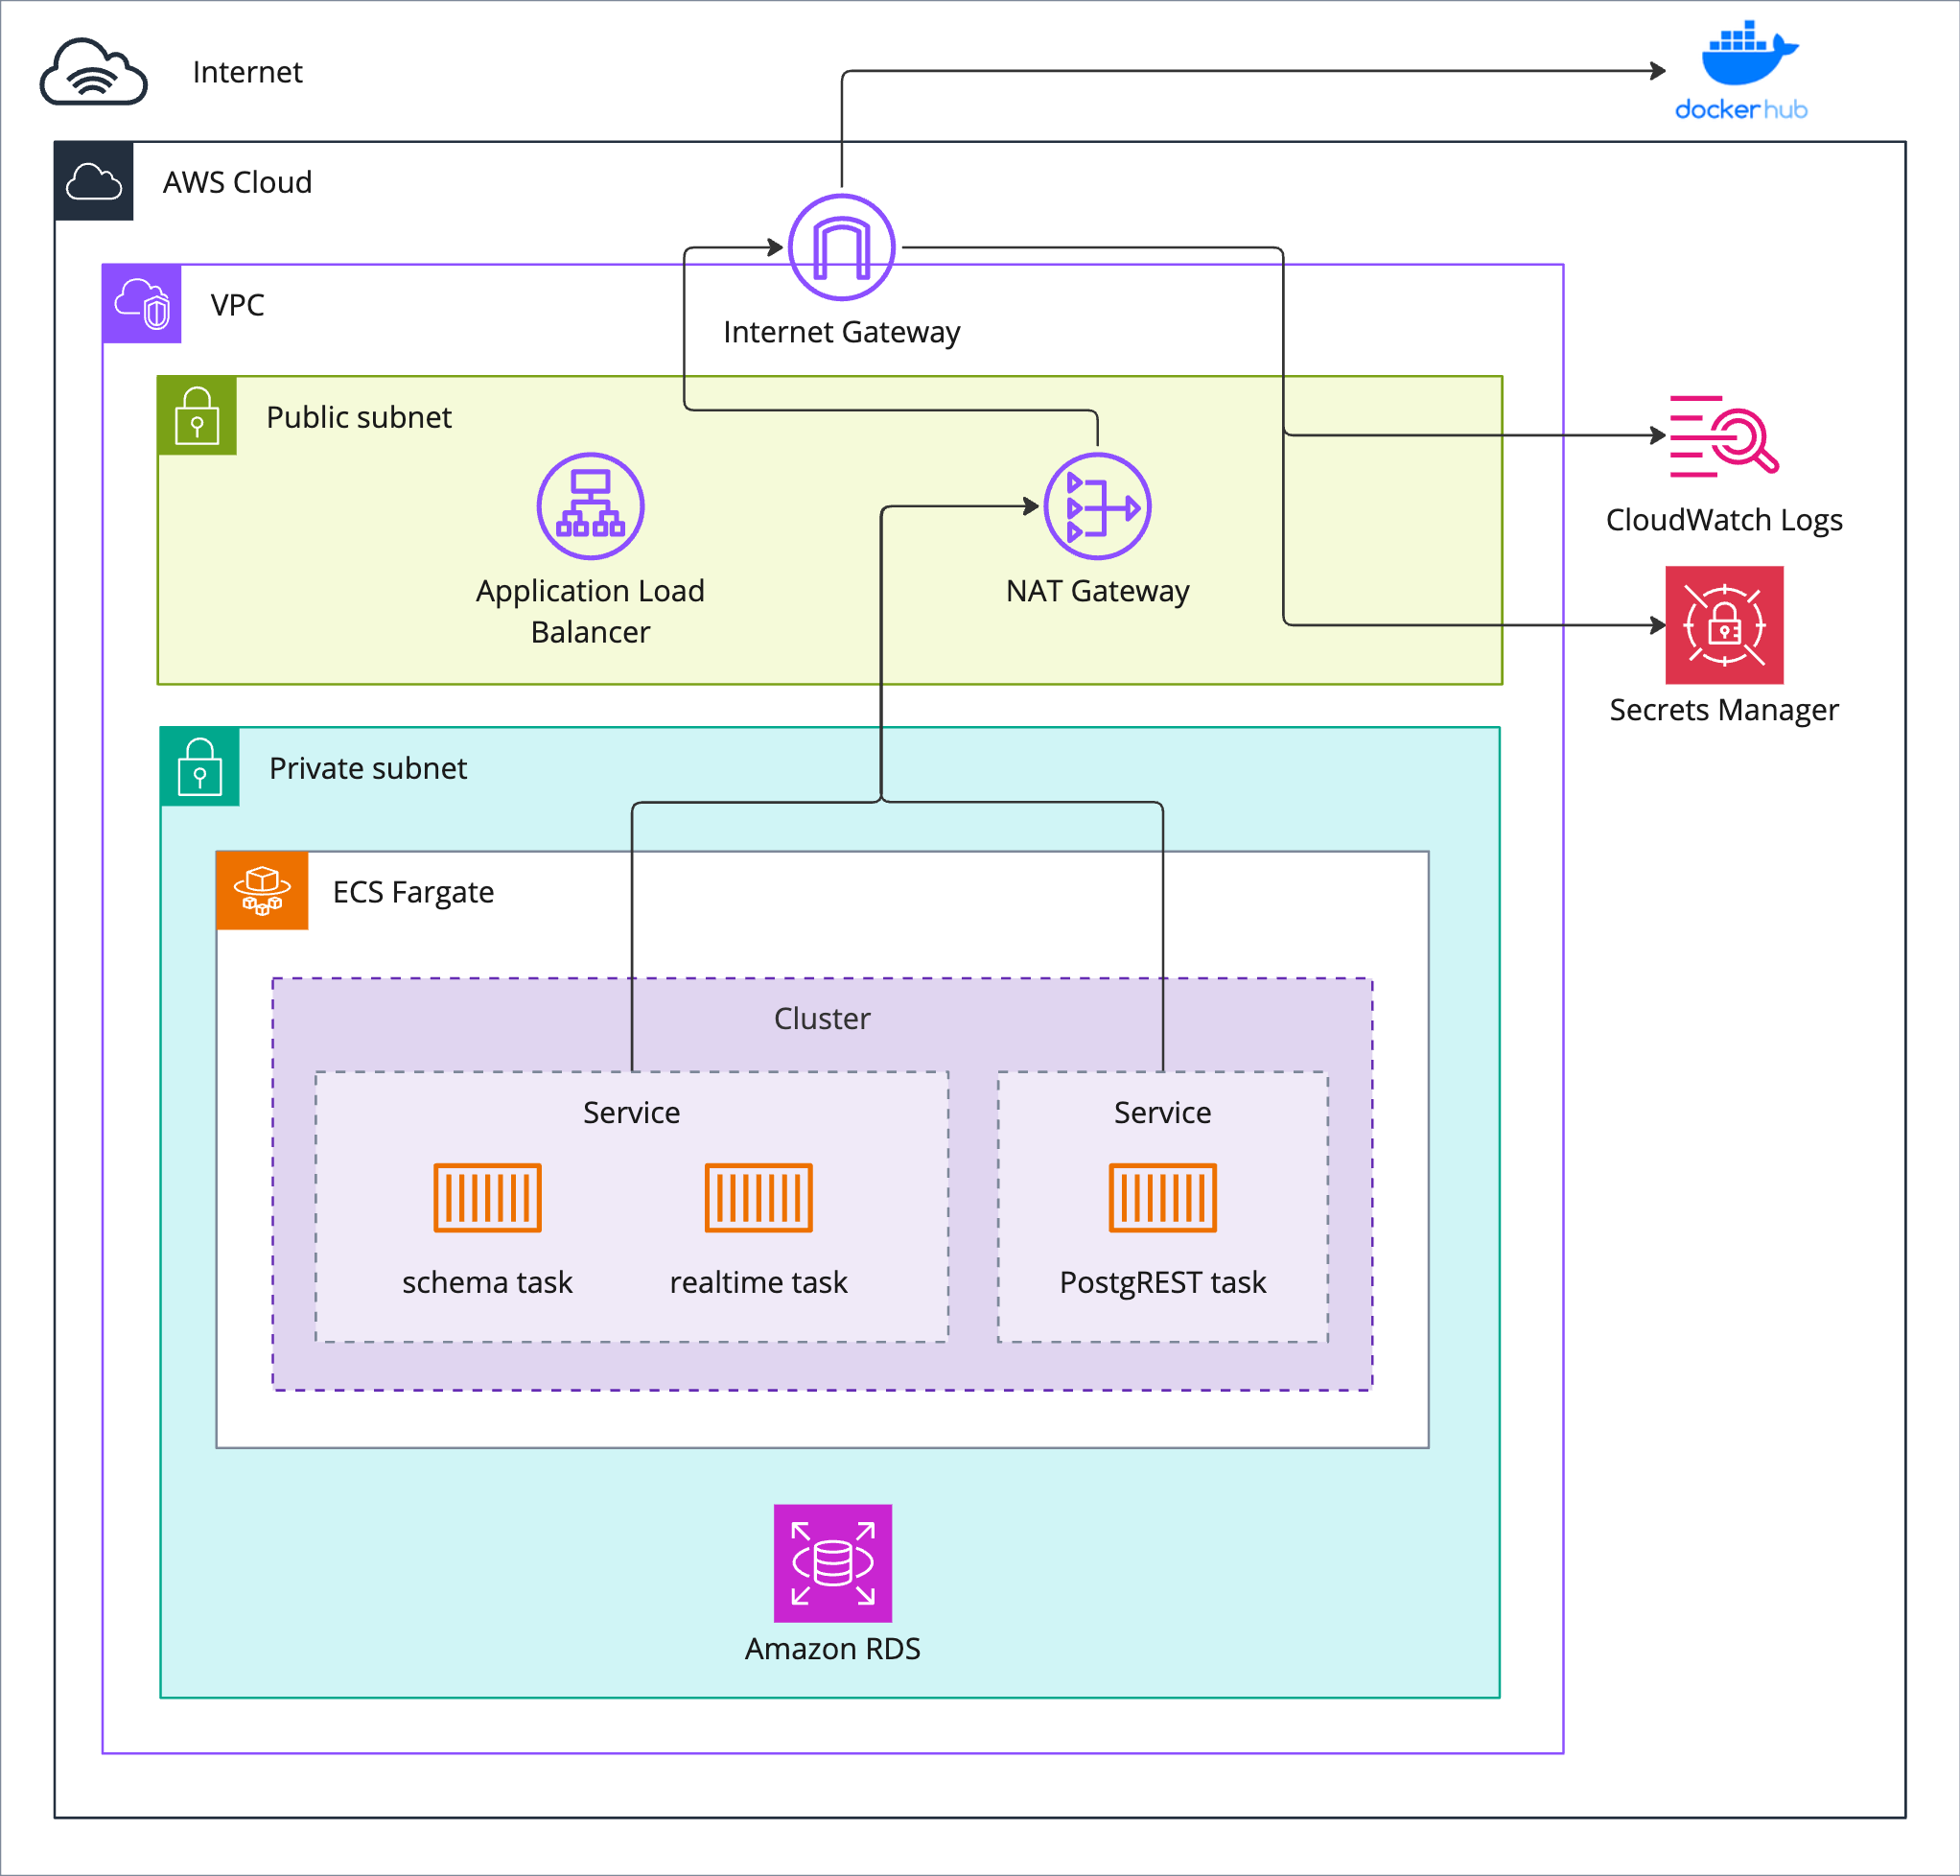
One drawback to this solution is the cost of an AWS NAT at $0.04 per hour and $0.04 per GB of data transferred. Instead of a NAT, another option would be an AWS VPC endpoint, which allows one to privately connect to AWS services like CloudWatch or Secrets Manager. This version would be cheaper at $0.01 per hour and $0.01 per GB transferred, per endpoint, and if we used AWS Elastic Container Registry (ECR) instead of Docker Hub to host our container images, we could eliminate the need for our private subnet to connect to the internet at all. All such container-related configuration/provisioning/logging traffic could stay inside AWS.
However, each connection to an AWS service would require its own VPC endpoint. In pursuit of simplicity, we chose to utilize fewer AWS resources by implementing the NAT gateway in our solution.
HTTPS
Since our backend manages sensitive data, it was necessary to implement SSL encryption on our backend URLs and then route all web traffic through the HTTPS connection.
To provide HTTPS compatibility, we provisioned a TLS certificate and attached it to our endpoint. Since it is impossible to attach a TLS cert directly to our load balancer DNS record, we require the user to provide a domain for their Snowclone backends. Once our user provides their Route 53 domain, we can request and validate a TLS certificate through AWS Certificate Manager (ACM).
A major design goal of our system is the ability to support multiple backends from a single point. Thus, we requested a wildcard certificate that extends SSL encryption to any subdomain on the domain. This allowed us to provide unique URLs for each backend:
- https://myfirstapp.domain.com
- https://mysecondapp.domain.com
HTTPS is terminated at the load balancer and inter-service communication happens via HTTP which remains secure since the Fargate tasks and database reside in private subnets.6
AWS Infrastructure
Our AWS infrastructure is composed of two main sections: admin and instance. The admin section is the
foundation for the cloud architecture of Snowclone and needs to be provisioned only once. With the admin
infrastructure in place, the instance section provisions the resources required for each new backend that a
Snowclone user deploys. These two sections of infrastructure are deployed via the Snowclone CLI commands
snowclone init and snowclone deploy, respectively. The CLI and its commands are
covered in-depth later in "Snowclone CLI".
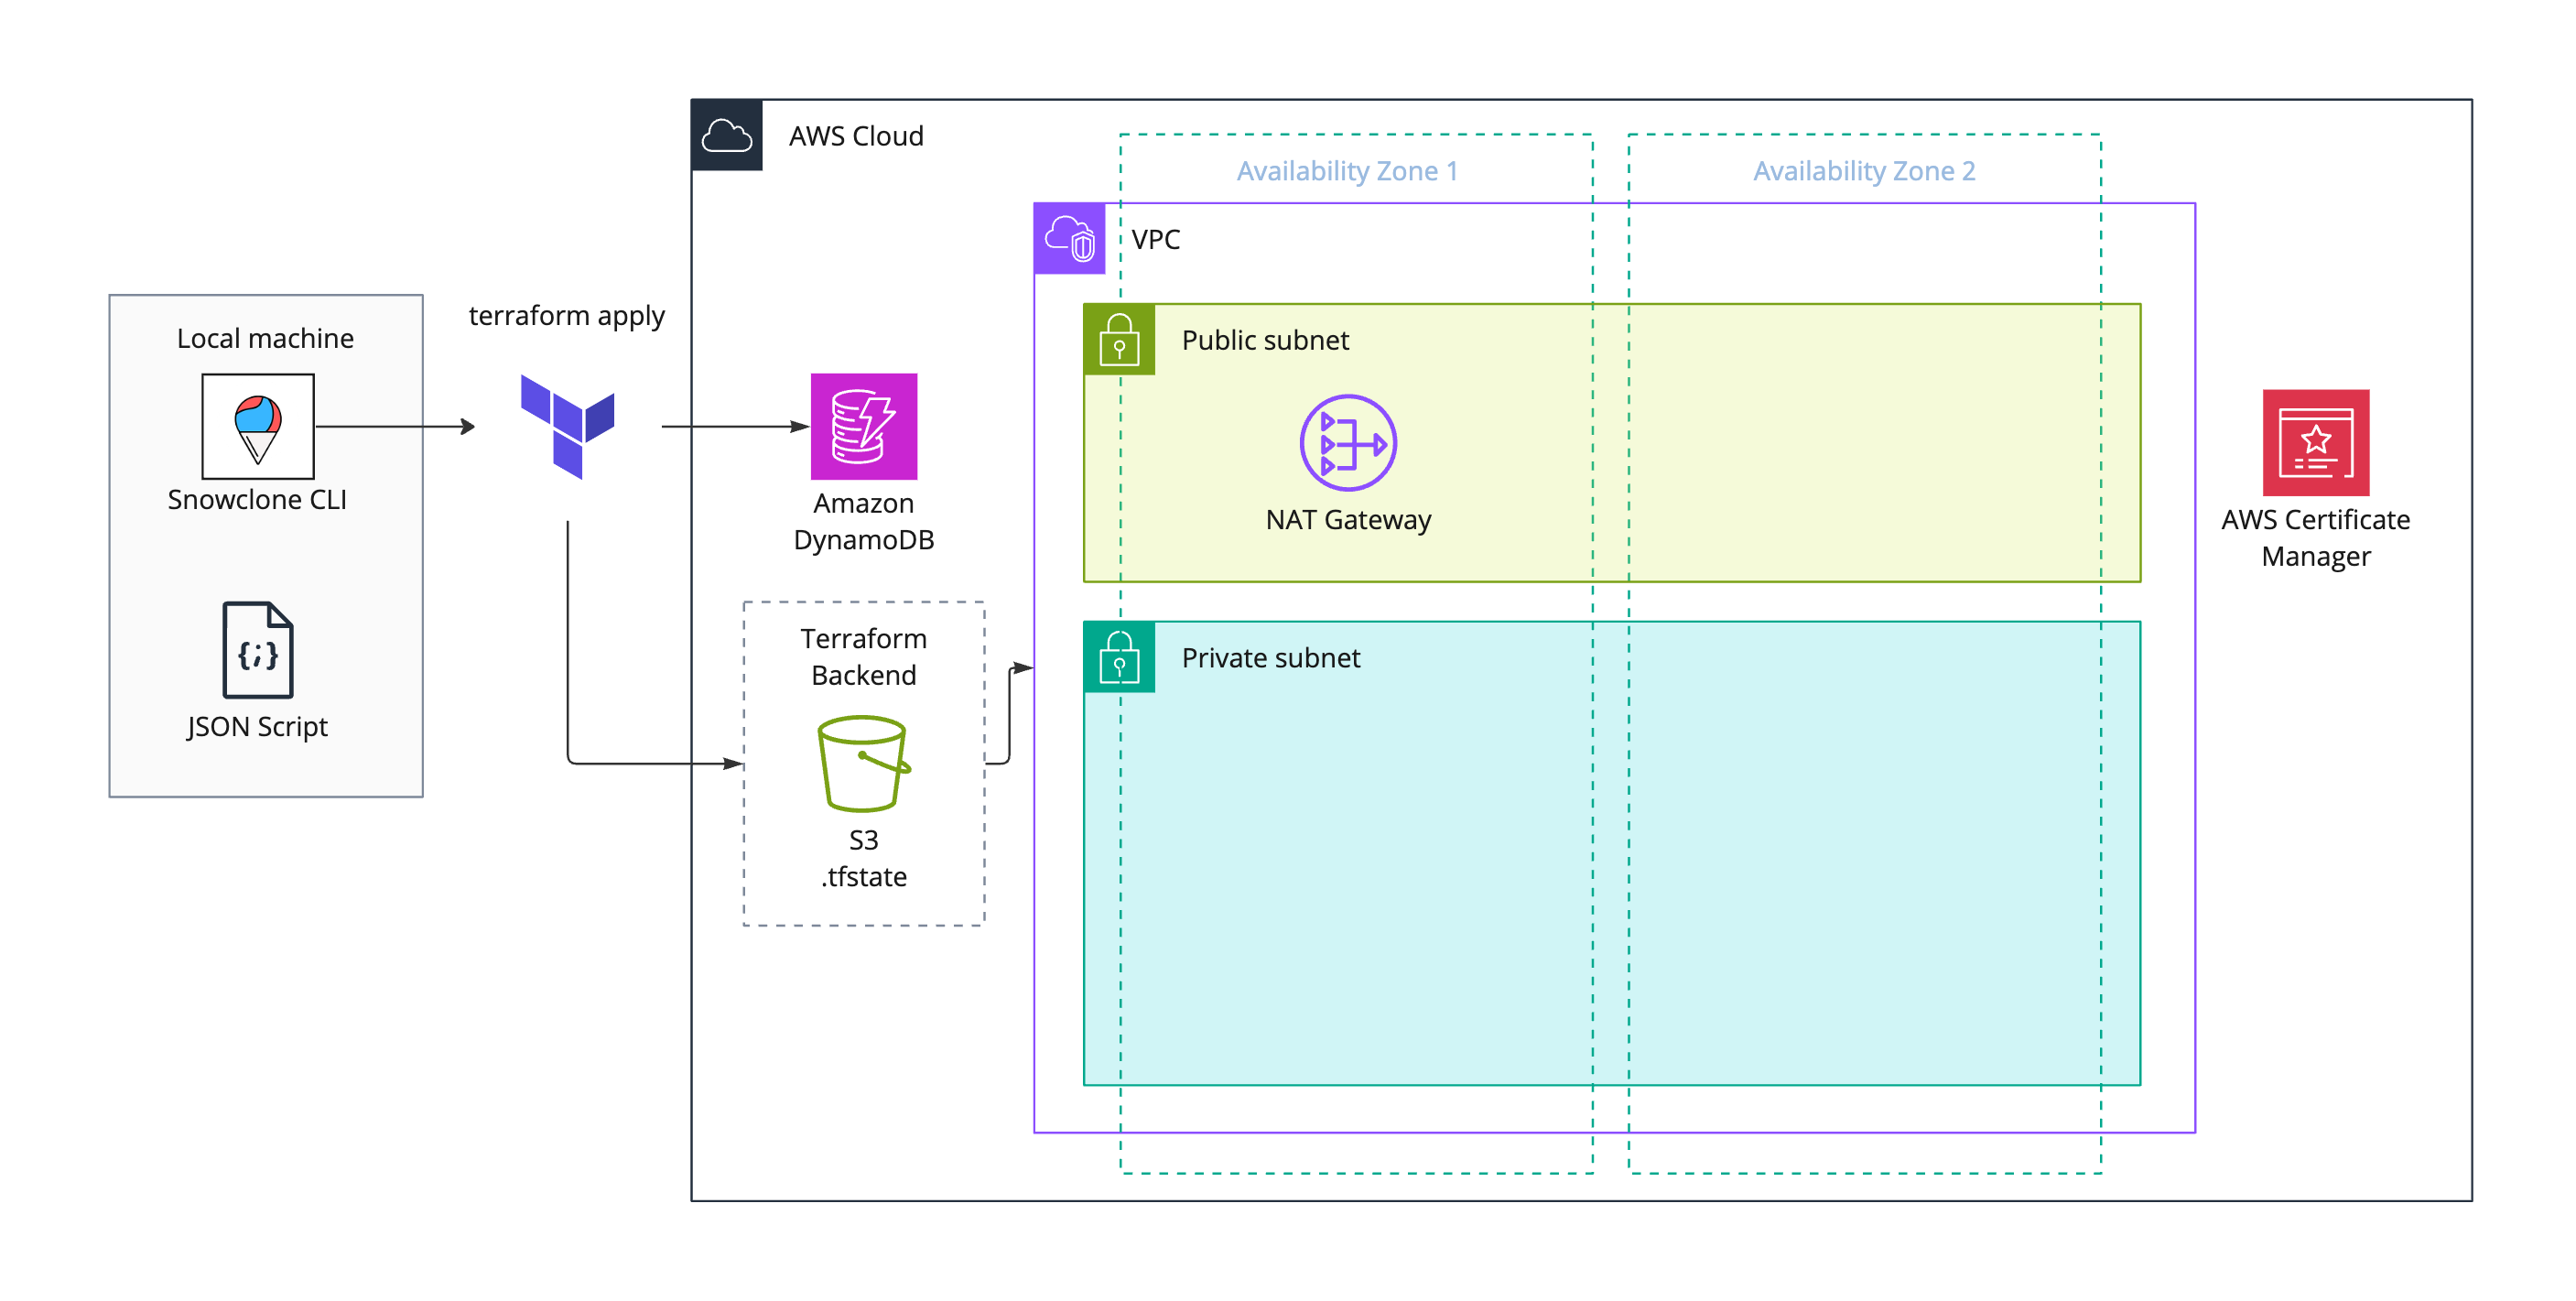
snowclone init. One NAT gateway is
provisioned in
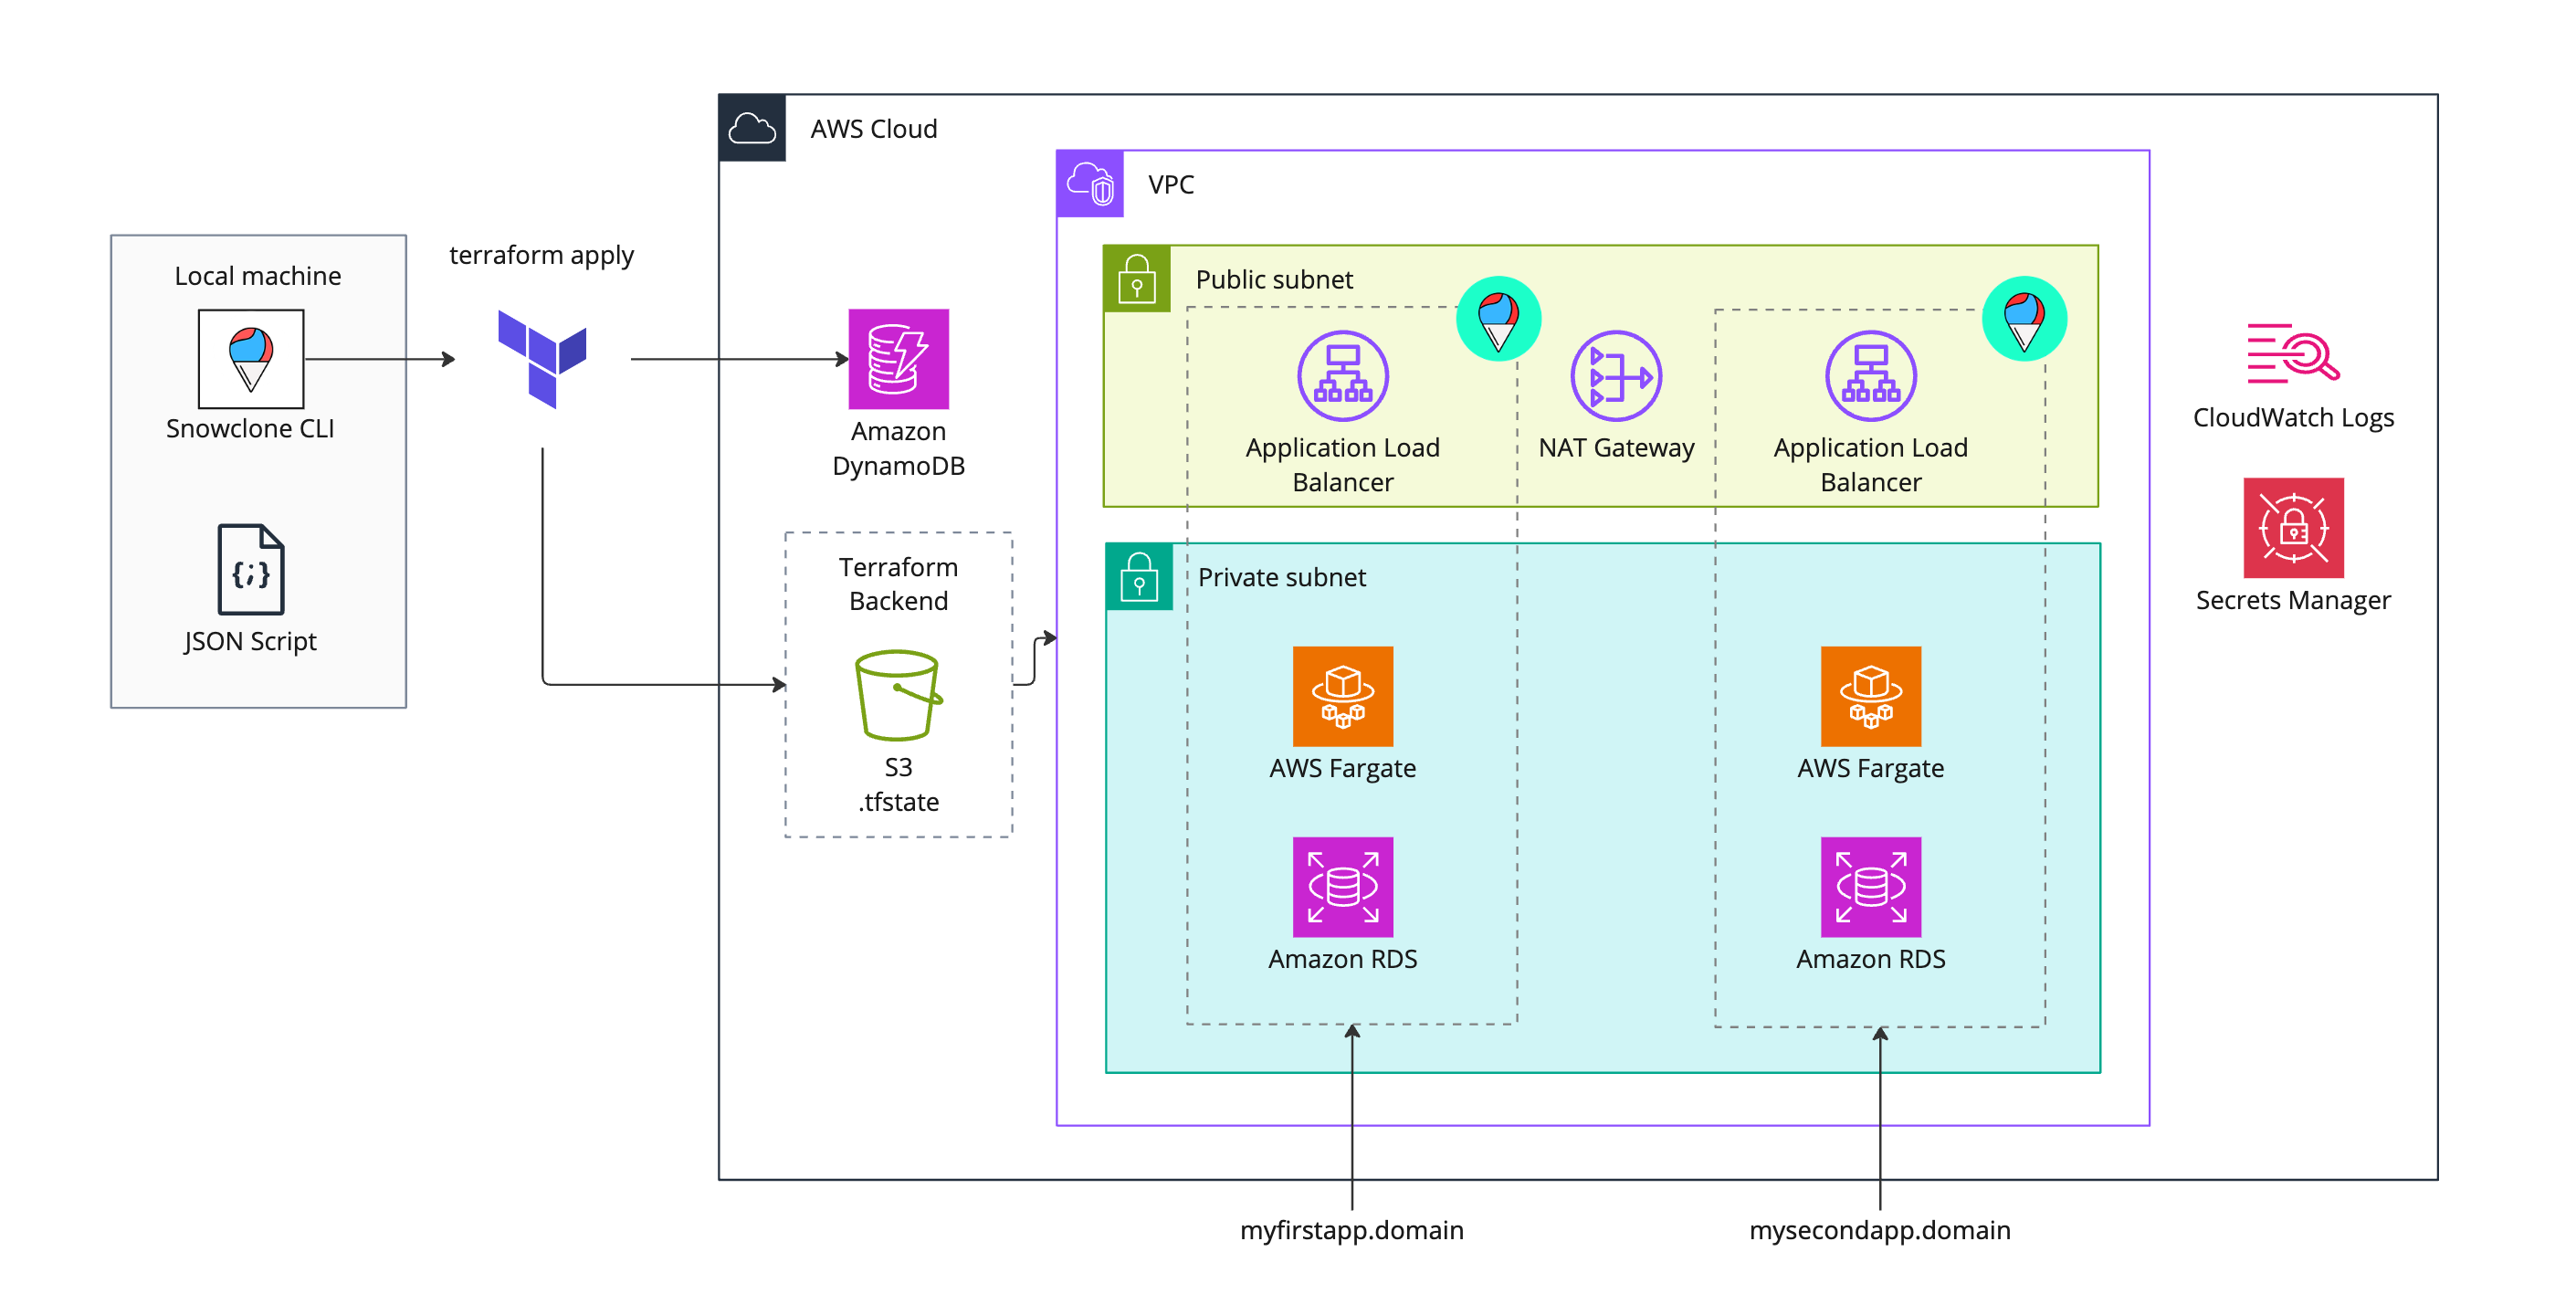
one Availability Zone for cost purposesThe admin infrastructure section creates the resources that every subsequent backend instance will rely on. These resources include network infrastructure like private subnets, route tables, NATs, DNS records, and SSL certificates and also an AWS IAM role that allows containers in Fargate to make AWS API calls. To address the challenge of managing multiple backends, an Amazon DynamoDB key-value table is created to keep track of backend project names and their associated URLs, while an Amazon S3 bucket stores the details of deployed resources for each backend (stored as Terraform state files— to be covered in more detail later on in "Terraform").
Once the groundwork of the admin section is laid, the instance infrastructure section contains the AWS resources for a single backend. Each of these components has been described in the above sections, and all are the same as a locally run version of Snowclone, except for the application load balancer, and security groups, both described above in “Data Access Control”. (Security groups are not pictured in the below diagram to avoid icon overcrowding.)
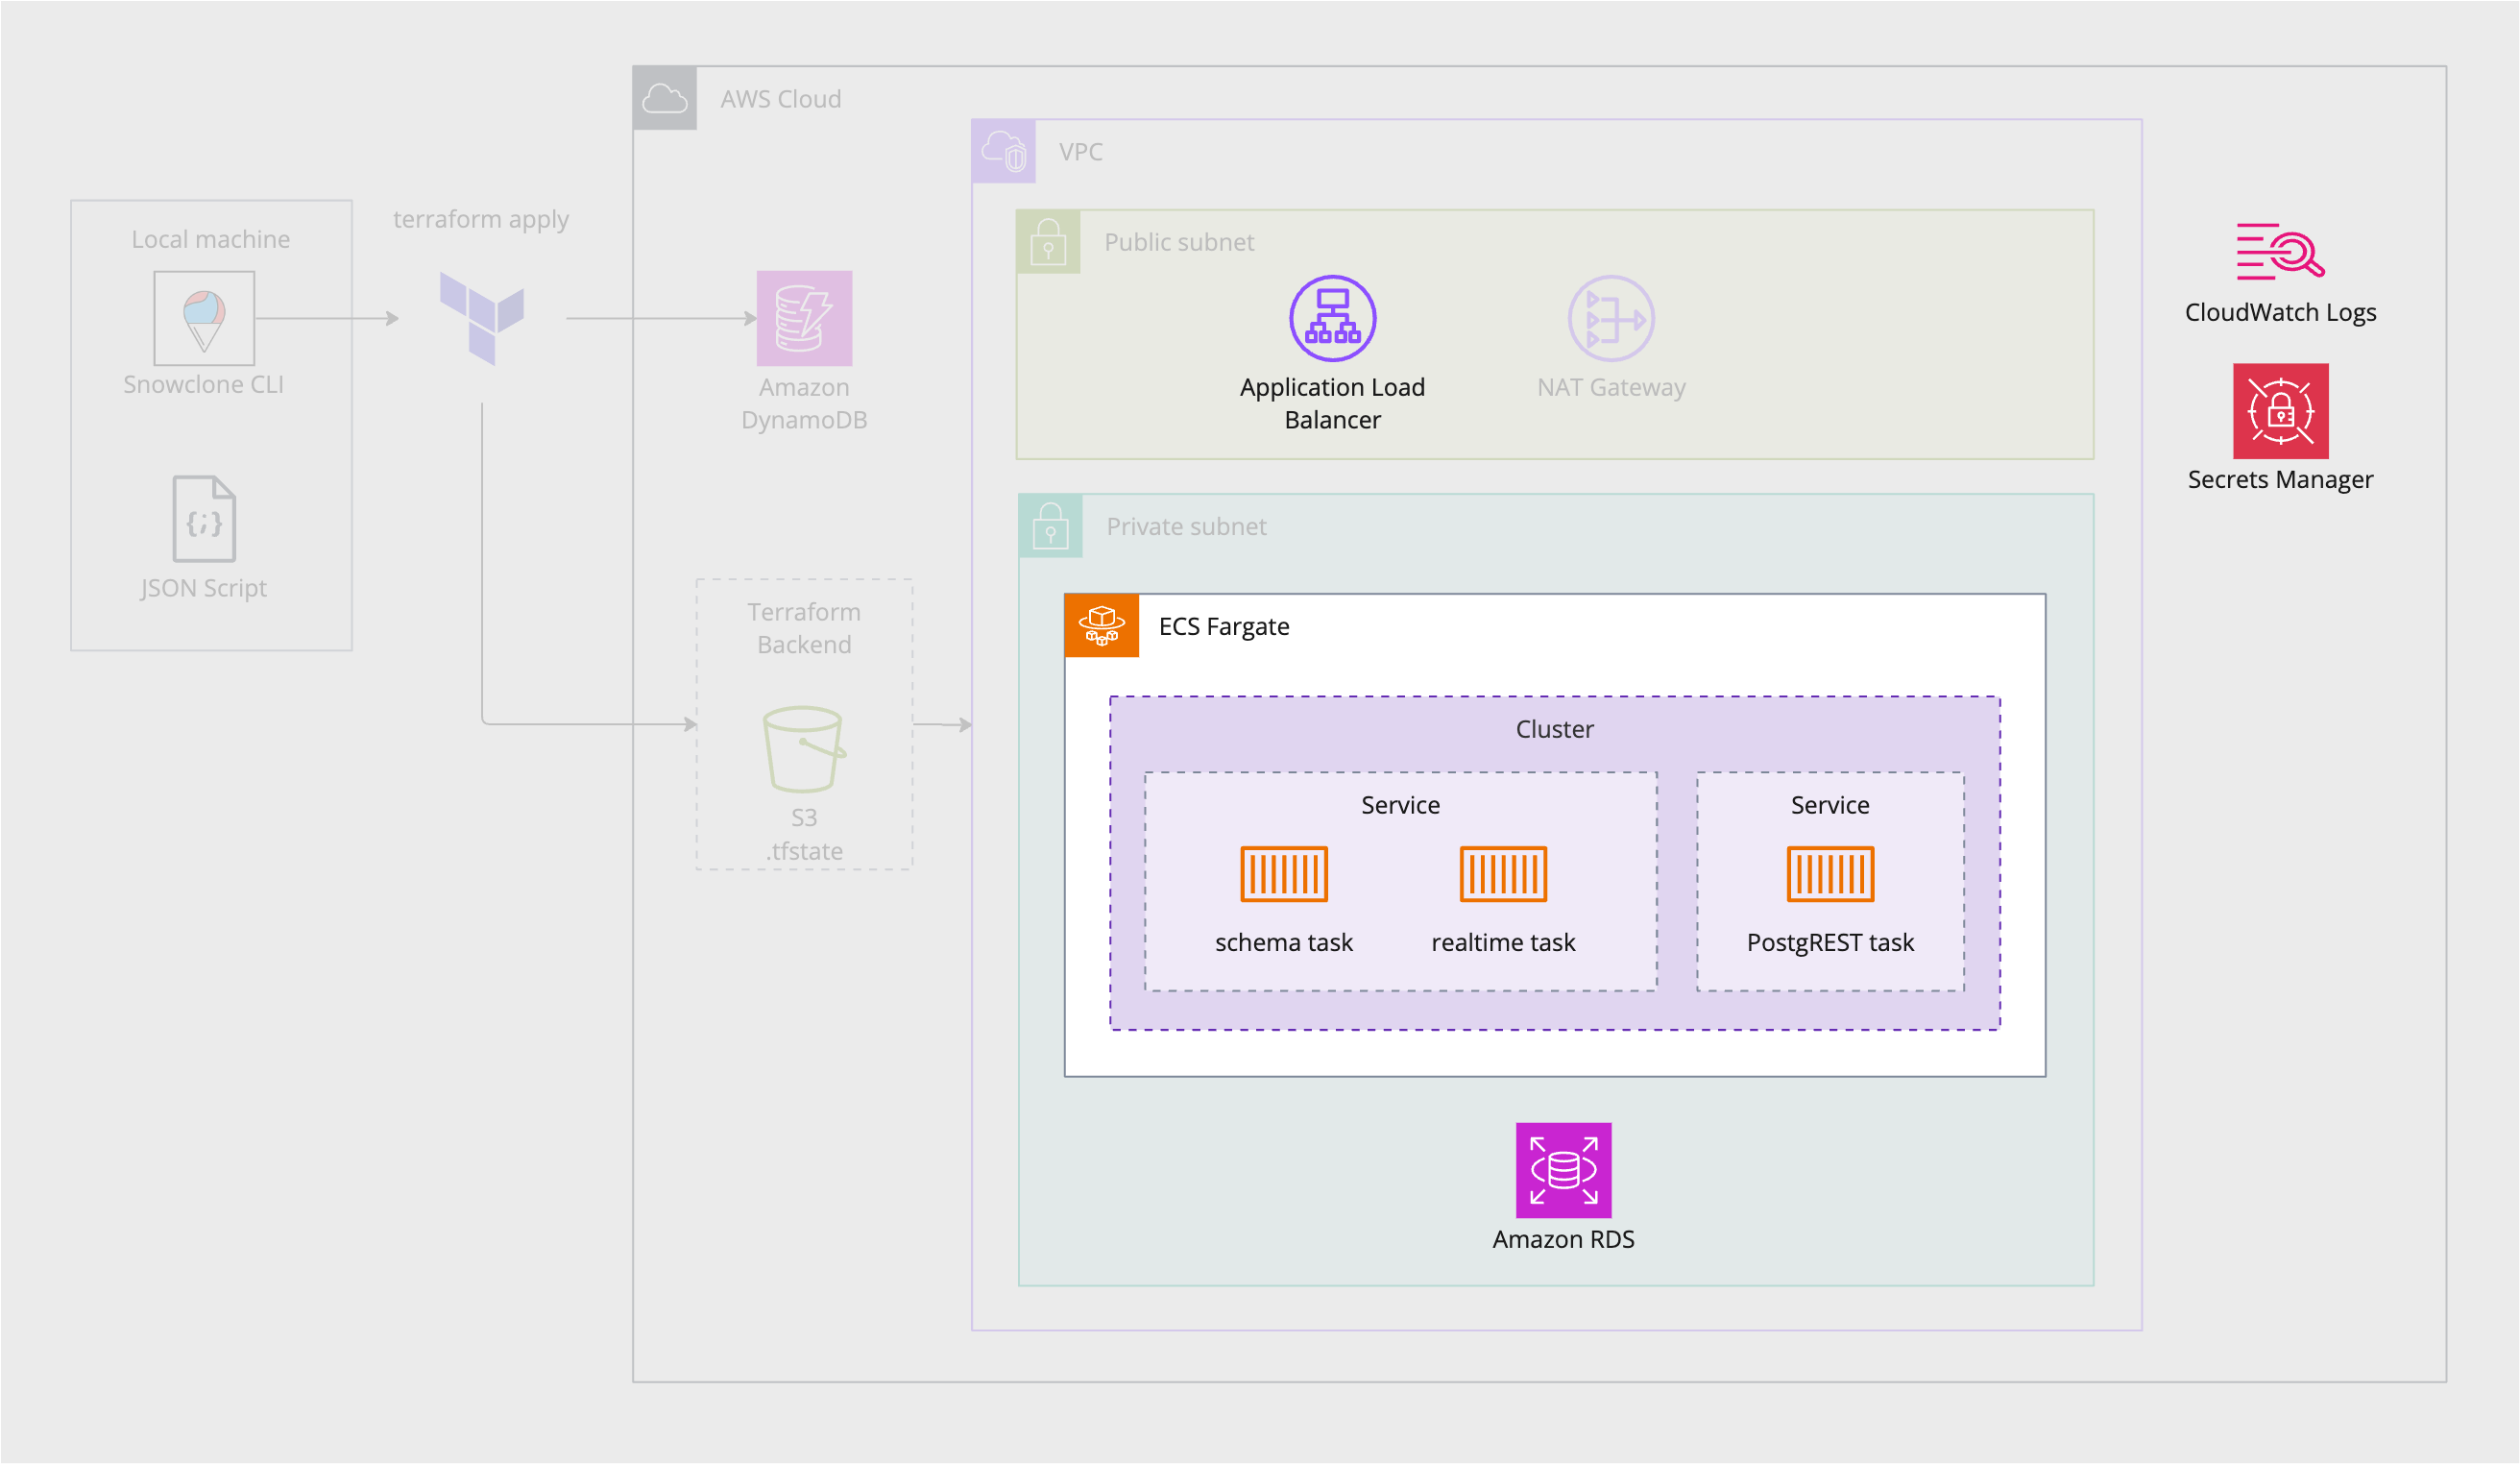
snowclone deployThe below figure is a culmination of our conversation on AWS infrastructure. In it, the admin infrastructure is shown alongside the infrastructure for two separate backends.
Terraform
With all of this necessary AWS infrastructure, we needed a way to quickly provision and remove resources
and keep track of what is deployed. For this, we turned to Terraform, an infrastructure-as-code (IaC) tool
written in HashiCorp Configuration Language (HCL). HCL is a declarative language, meaning we declare what
resources we want to be provisioned within the configuration files, and Terraform plans and executes that
provisioning. Terraform keeps track of the state of the resources it has provisioned in a
.tfstate file,
which stores the resource data in JSON format and references this file when other terraform commands are
executed.
By default, this Terraform state file is stored on the user’s local machine. However, it is common for teams to want to collaborate and have access to the state files. For these situations Terraform allows state files to be stored in a remote backend, and in the case of Snowclone, we elected to store state in an S3 bucket to enable collaboration.
Snowclone CLI
Although Terraform makes deploying AWS resources much more streamlined, there are a few considerations that make it more complicated:
- Configuring remote state on S3
- Keeping track of all the variables Terraform needs to name resources
- Enabling the provisioning of multiple instances of the same Terraform configuration files
We wanted to streamline this process as much as possible for our users. To accomplish this, we built a command line interface to be the primary way users interact with Snowclone. Its main purpose is to wrap Terraform commands into simple CLI commands.
snowclone init is the first command a user must run to provision the admin infrastructure that
enables
backend instances to be deployed. When a Route 53 registered domain name and an AWS region are specified, an
S3
bucket is configured as a remote backend for Terraform, necessary IAM roles are set up, and a VPC with
subnets is provisioned to be shared across backend instances. A DynamoDB table is also provisioned to keep
track of information about any backends deployed. Last, a JSON file is created to store subnet IDs, the S3
bucket name, region, and domain on the local machine. When deploying backends, this data is plugged
into Terraform as variables.
snowclone deploy first prompts a user for project-specific information before provisioning a
backend
instance. The project information is then saved to DynamoDB to be queried when a user wants to see what
backends are active or remove a backend.
snowclone import prompts the user for a backend name and the path to a SQL file, then imports
that file
into the backend’s Postgres database.
snowclone remove removes all the infrastructure associated with a backend and deletes the
associated record from DynamoDB.
snowclone melt removes all admin infrastructure and returns the user’s AWS account to its
previous state before interacting with Snowclone.
Notes
-
We provisioned two services in our Fargate cluster since it was necessary to decouple the PostgREST task from the schema upload task. This was a catch-22 situation where the postgREST task failed because it couldn’t log into the database, which caused the entire service to fail. This failed service included the schema task, through which we needed to upload the SQL file that created credentials for postgREST to log into the database. With postgREST moved to its own service, the schema task stayed up and we could upload our login SQL file. PostgREST could now log into the database, and all services passed their health checks.
Our schema and realtime servers are deployed on a single ECS service. This decision was made to minimize the amount of AWS resources, and a reasonable idea for future work would be to break the realtime task out into its own service to facilitate scalability.
↩︎ -
A potential workaround was to make our ECS Fargate-hosted database service stateful by persisting its data to Amazon Elastic Block Storage (EBS) and then reloading new task instances with this persisted data. Despite recent advances in ECS/EBS integration, this proposed volume reattachment to create stateful ECS services is not yet possible. ↩︎
-
The distinction between a public and private subnet is that a public subnet has a route to the Internet. The private and public subnets are contained within the Virtual Private Cloud (VPC) of the user’s AWS environment. A VPC is a logically isolated virtual network similar to a traditional network one would host in one’s own data center. Once a VPC has subnets, AWS resources can be deployed to that VPC. ↩︎
-
Our realtime server’s code needed a tweak once deployed to AWS. ALBs on AWS have a default idle timeout of 60 seconds. Anytime a client connected to our realtime server exceeded this span without receiving a Server-Sent Event (SSE) the ALB terminated the connection. Our solution was for our server to send a keep-alive message every 30 seconds. ↩︎
-
Logs were another challenge posed by our deployment to AWS. In a local Snowclone instance, Docker handled the logs of each container. Docker commands are unavailable in ECS, so we used AWS CloudWatch as our central log repository for all ECS services. CloudWatch allowed each separate backend to have its own CloudWatch log group where all of that backend’s services’s logs are collected. The drawback here is a decrease in accessibility to the logs — instead of viewing them directly from the local command line, a user needs to log in to their AWS console and view the logs in CloudWatch. ↩︎
-
AWS Virtual Private Clouds are Software Defined Networks where traffic is encapsulated and authenticated at the packet level. https://kevin.burke.dev/kevin/aws-alb-validation-tls-reply/ ↩︎