Snowclone Design
On this page
Designing Snowclone
To fulfill our primary design goals, we needed to provide our users with a database, a CRUD API, API documentation, and a service for real-time notifications. We also needed to provide a way for the user to deploy this stack using a single command. Finally, we needed to ensure database security and API authentication.
The Database
We opted for PostgreSQL (Postgres) as our relational database solution due to its
extensive documentation
and active support within the developer community. In addition, we used Postgres' database roles
functionality to secure the database against unauthorized access. Postgres also comes with a
LISTEN/NOTIFY
feature that allows its users to attach listeners to table changes. This enabled us to turn on our realtime
notifications functionality.
Schema Uploads
With a database in place, the user needs to be able to define the schema for that database. Once the database is deployed, the user can log into Postgres and run SQL commands to define their schema manually. However, this is a hassle and we wanted to find a solution with better usability. To solve this, we created an API endpoint for uploading .sql files. These files can contain the commands to define schema, change schema (schema migration), and add functions, such as listeners. We implemented this via an express server that enables users to send an HTTP POST request to “/schema” with a .sql file. We call this the “schema server.” The schema server reads the file, parses it, and sends the SQL commands against the database. Thus, the “Give me a SQL file…” part of our main objective was fulfilled. To secure the server, we used a secret API token that only the developer has access to. The schema server only accepts requests with an authentication header containing this token.
CRUD API
With the database and schema in place, users need to be able to perform CRUD (Create, Read, Update, Delete) operations from their frontend app. Since one of our design goals was to offload as much setup work from our users as possible, we chose to use PostgREST to help users automatically set up their CRUD endpoints.
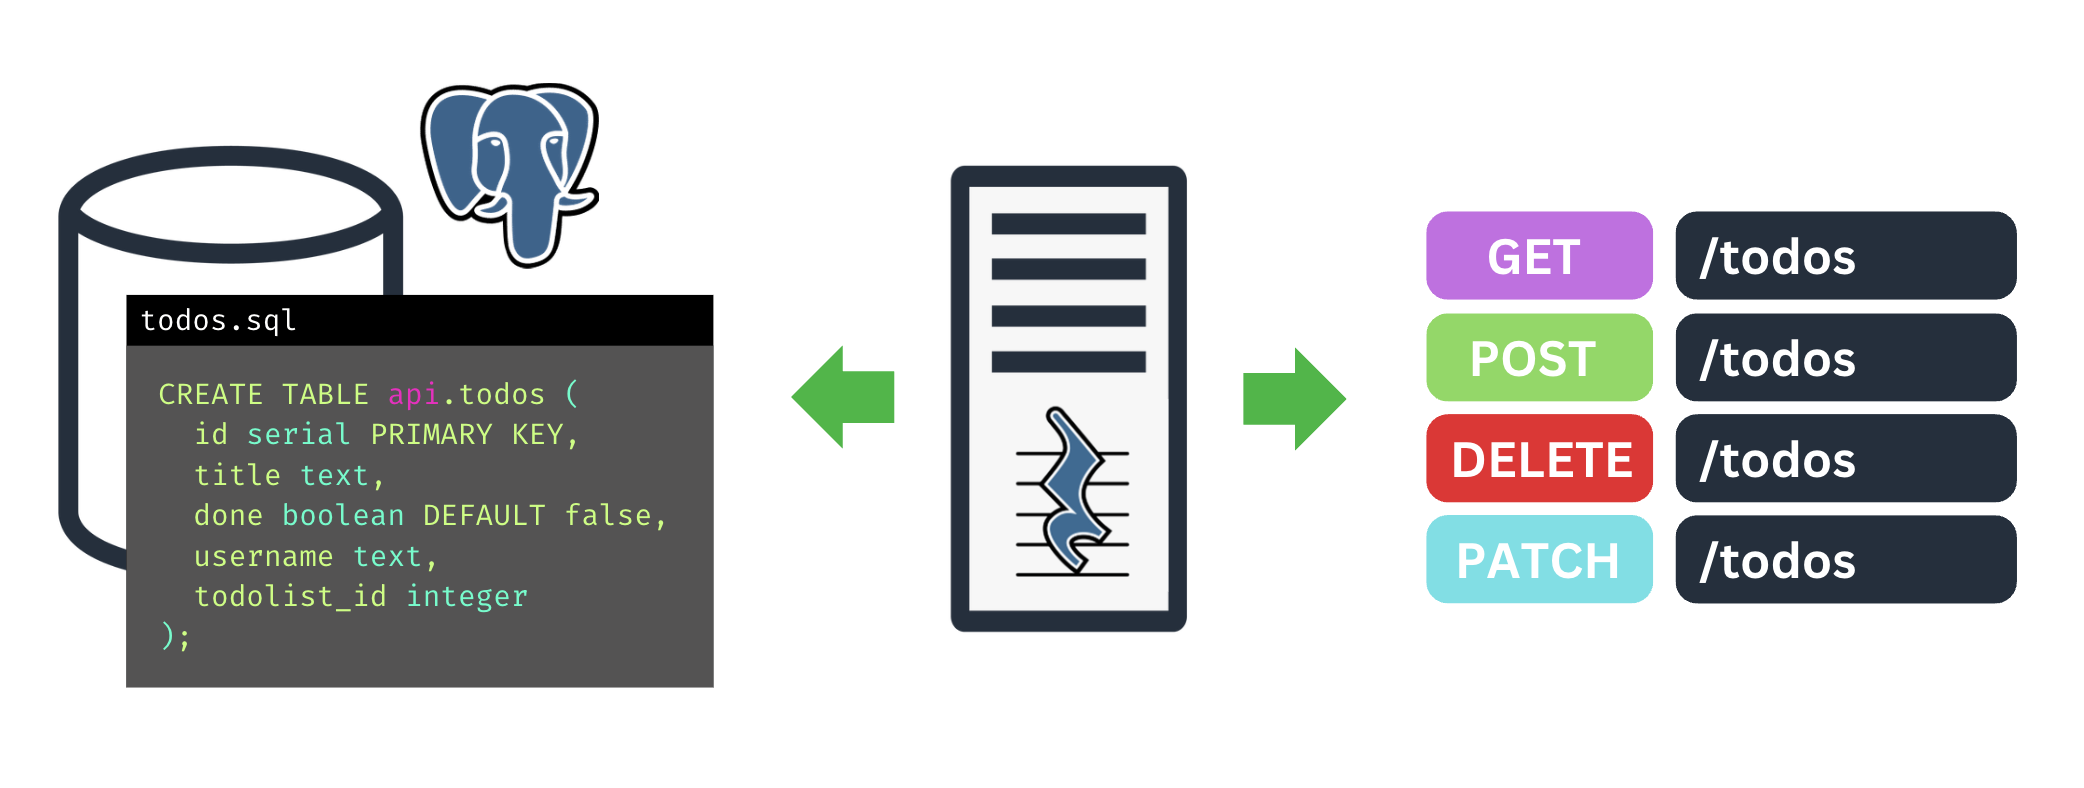
PostgREST is an out-of-the-box API server that automatically generates a REST API from a Postgres database. It does this by leveraging the database's structure and mapping HTTP methods to SQL operations (for example, a POST request maps to INSERT INTO a table). Thus, once our user uploads their schema, PostgREST automatically provides the CRUD API without the need to write custom endpoints—another design goal checked off!
API Documentation
PostgREST's strength of automatically creating API endpoints presented us with the next challenge. If you didn't write the endpoints, how will you know how to access them? PostgREST automatically serves an OpenAPI description document in its root path. This document is a machine-readable description of the PostgREST API, detailing endpoints, request/response formats, and other specifications to facilitate API consumption. Its format (typically JSON) is easy to read for machines, but less so for human developers.

We chose Swagger UI, an open-source API generator, due to its usability and broad compatibility. The Swagger UI server reads the OpenAPI document generated by PostgREST and generates a user-friendly and interactive web-based dashboard for API documentation.
Notifications
Next, we tackled a key component of our design goals: real-time notifications. To enable notifications, we needed a way to listen to database changes and send a notification that the frontend app could subscribe to. The two options we considered were Web Sockets and Server-Sent Events (SSE).
Web Sockets support two-way communication between a client and a server, while SSE is a one-way communication technology that enables a server to send updates to a client over a single, long-lived HTTP connection. Both are used to enable real-time notifications. The primary difference between the two lies in their bidirectional vs. unidirectional nature. Web Sockets are like walkie-talkies, whereas SSE is like a radio.
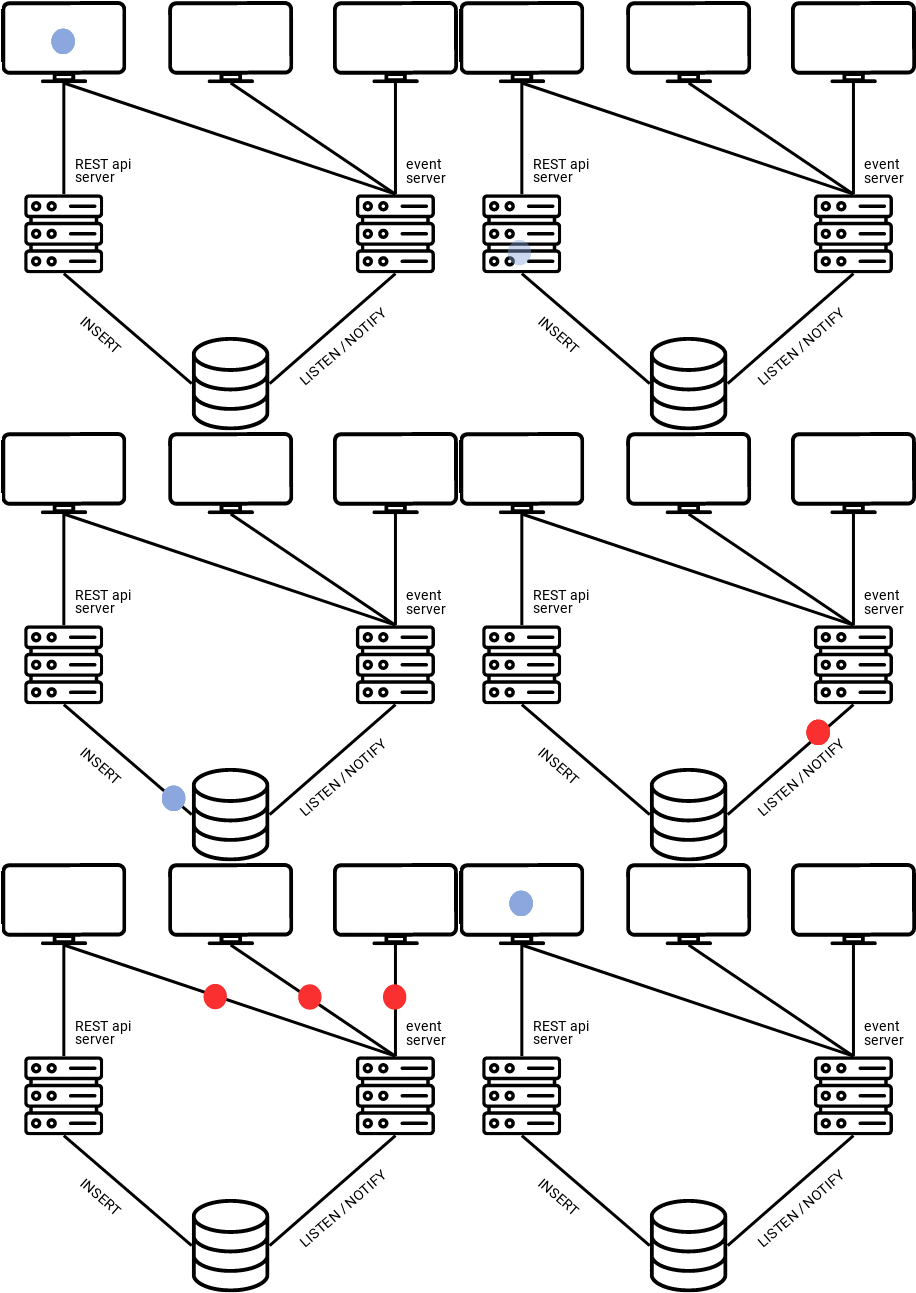
For our use case, we chose SSE, given that notifications only need to flow one way (from the server to the client). As shown in the graphic below, clients send their updates to the RESTful API server, those updates get added to the database, which triggers a notification to the “event server,” and then the event server broadcasts notifications to clients that are subscribed to it via a “/realtime” endpoint. The clients can effectively communicate with each other by sending messages to the RESTful API, and then listening on the “radio” of the event server.
That leads to the question, how does the database know when and what to send notifications based on?
Postgres' LISTEN/NOTIFY feature and our schema server combined to answer this question. On
Postgres, users
can write functions to have the database send a notification whenever an insertion, update, or deletion
occurs (such as an update to the “messages” table for a chat app). However, this would again require
manually connecting to the Postgres database and executing commands.
Since we already have a schema server, we can leverage it to solve this problem as well. Just as we used it for schema uploads, we can use it to enable the uploads of listener function definitions as well. This way, users can upload their custom listeners according to the specific needs of their applications.
Deployment
With all the above pieces in place, the next step was to package them up and allow the user to deploy them using a single command.
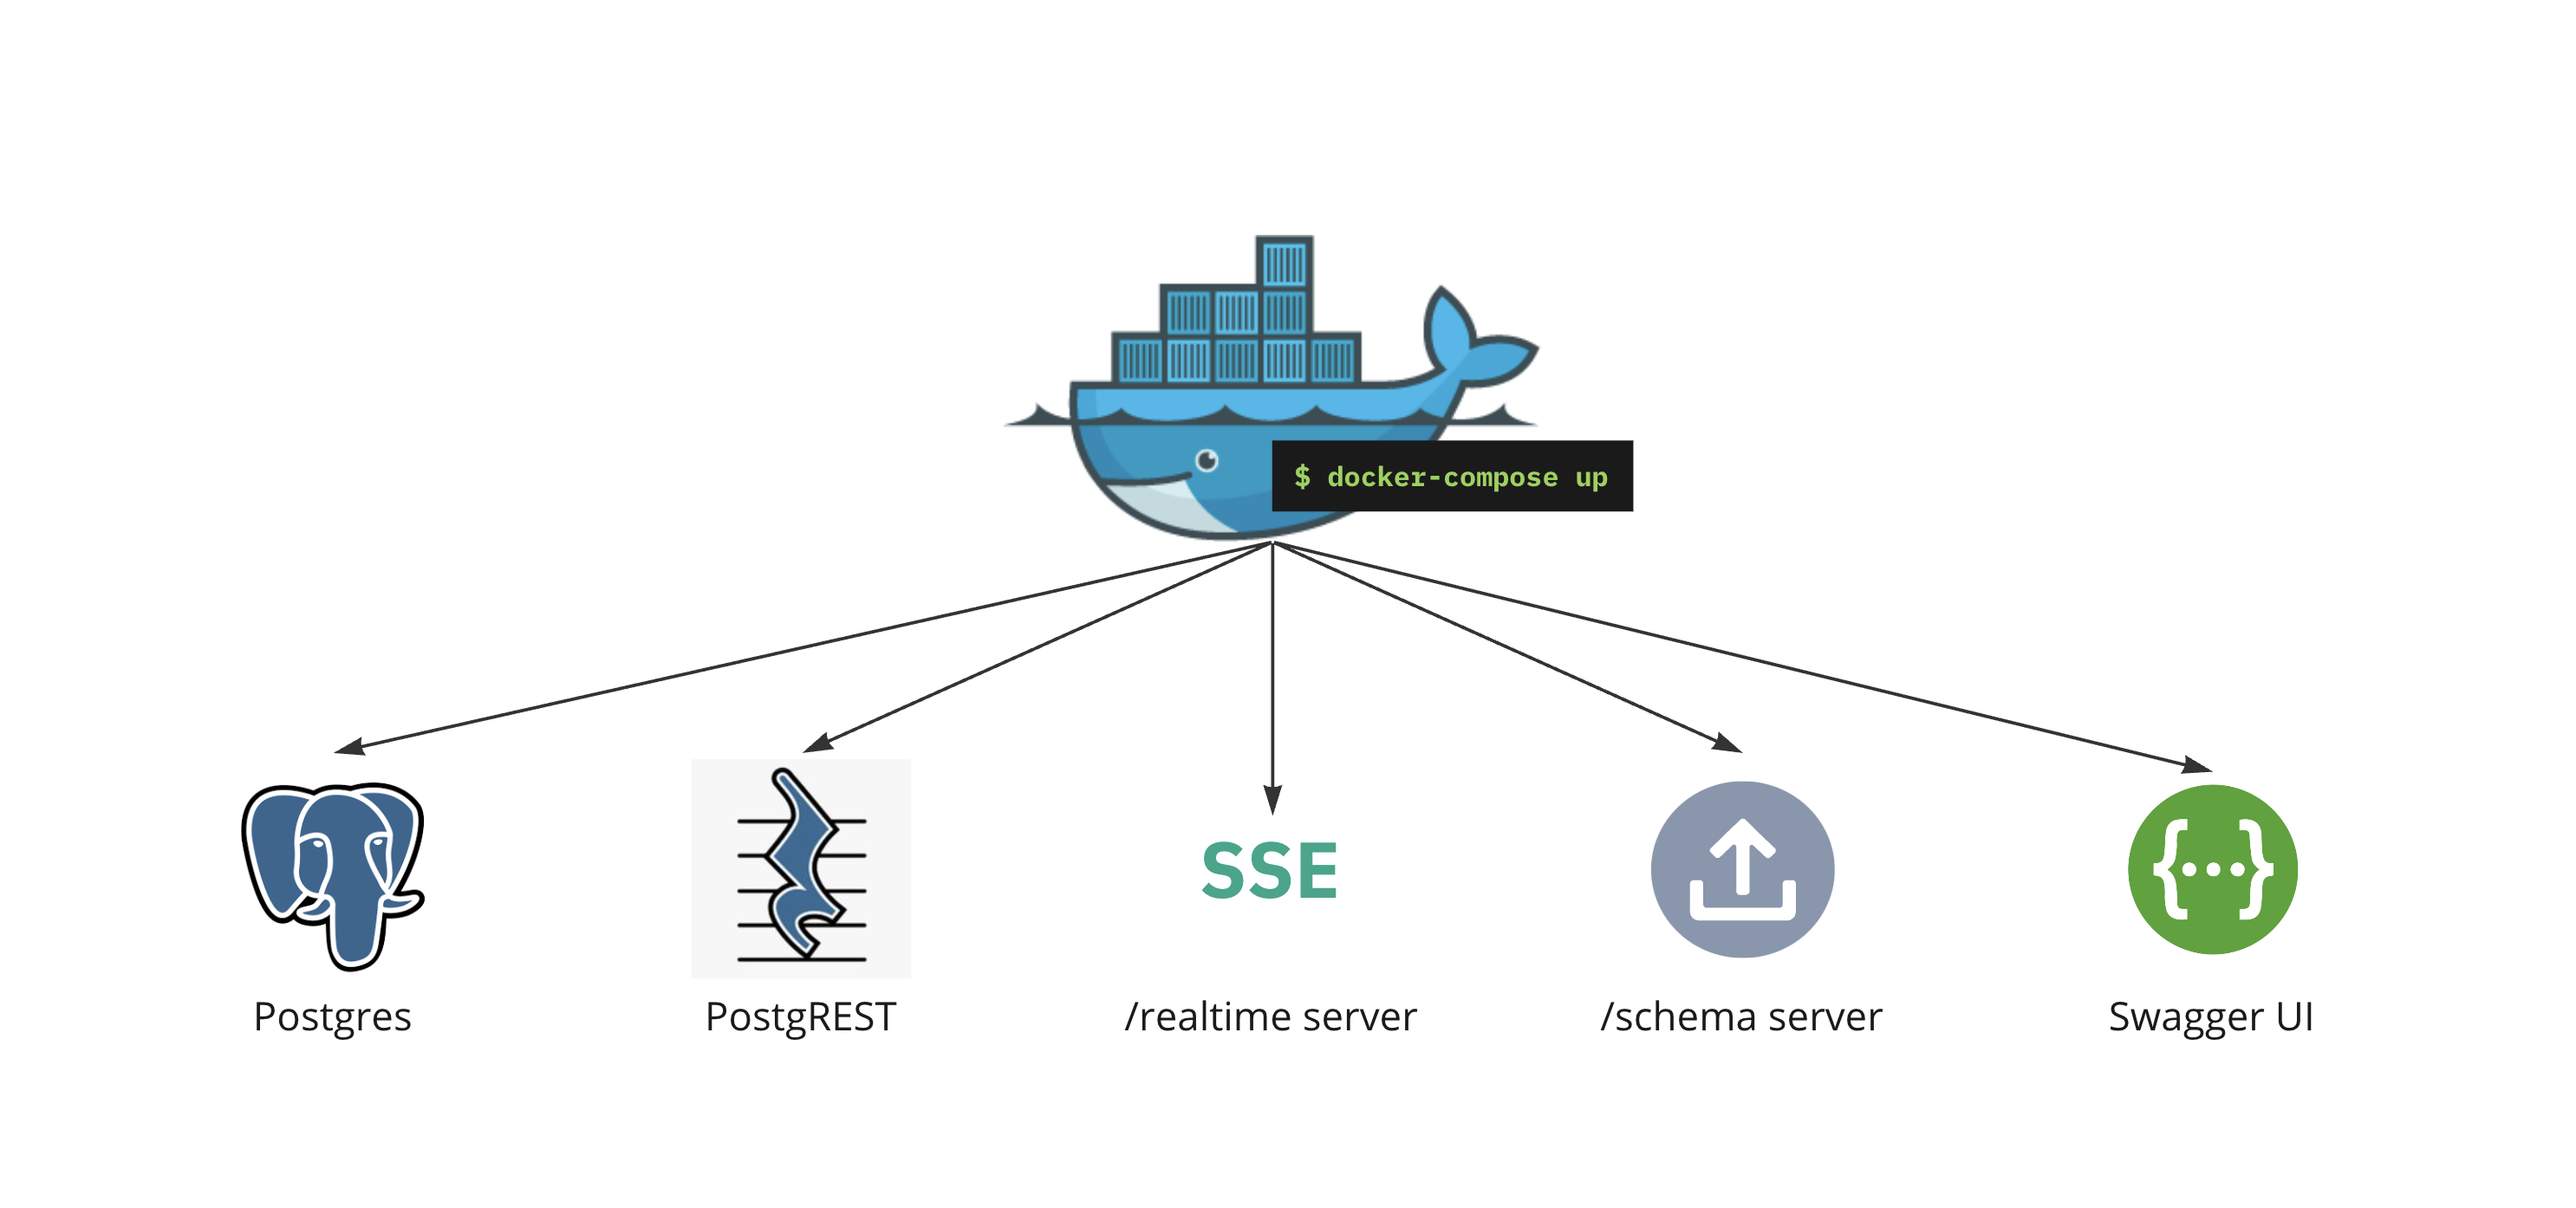
To accomplish this, we containerized all of our services, uploaded them to Dockerhub, and wrote a
docker-compose file with the necessary configurations to download and run the images. Thus, with a single
docker compose up command, Snowclone delivers a backend with all of its services to a local
docker
environment.
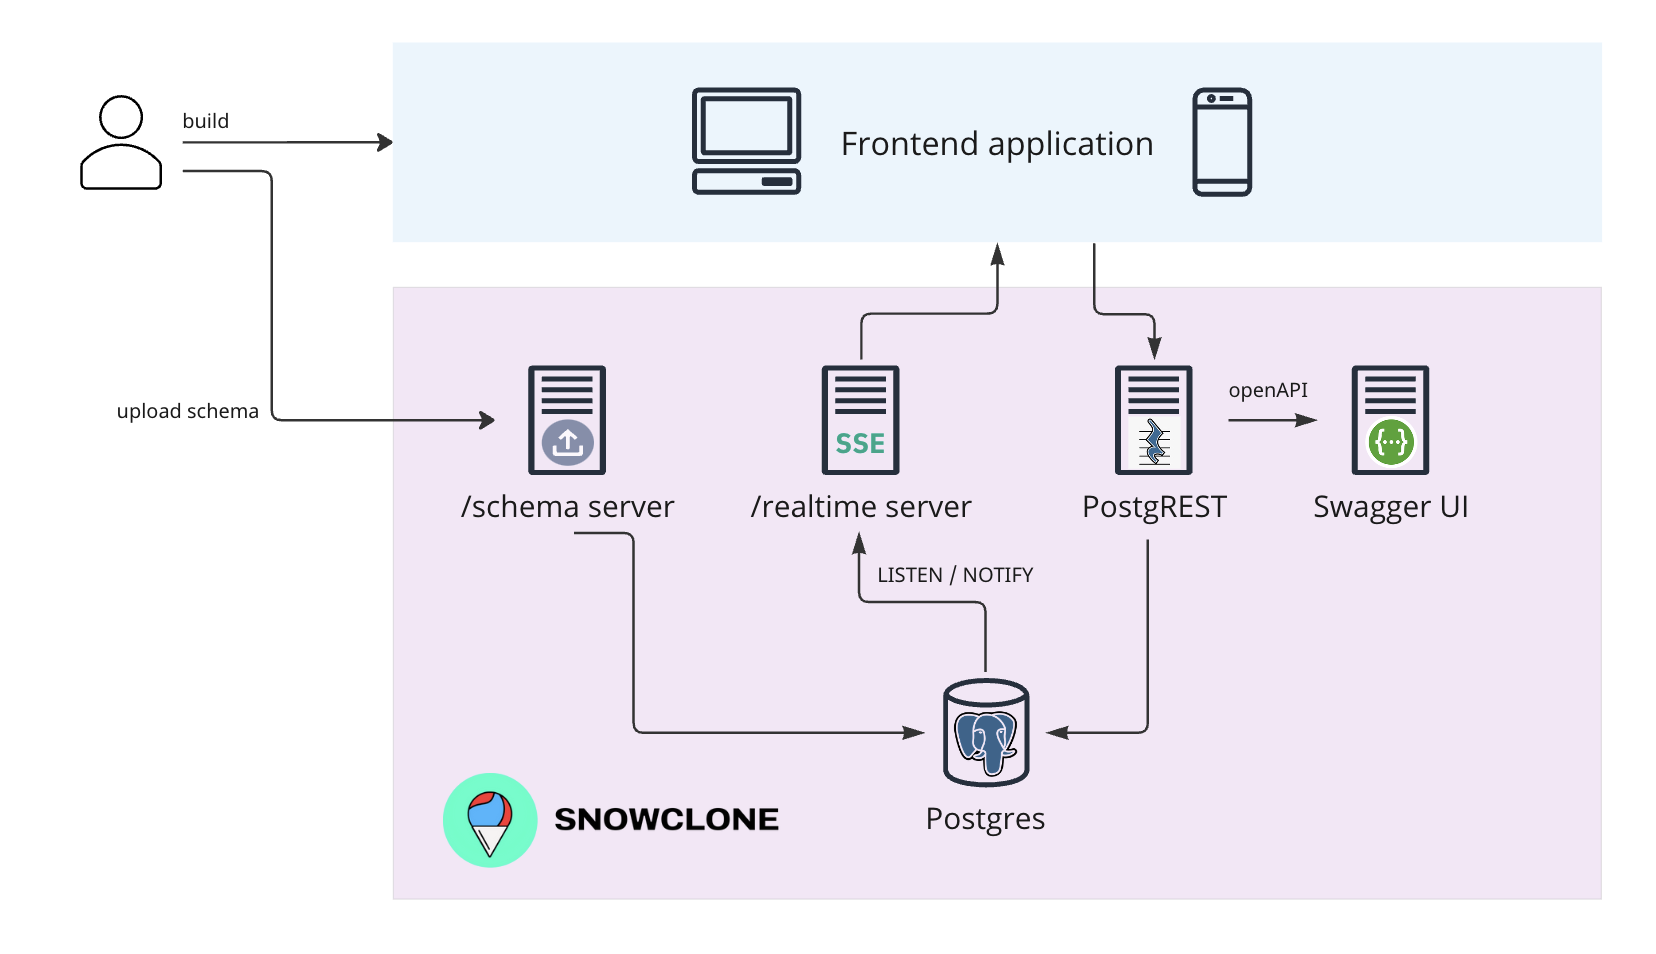
Once deployed, here is what our microservices architecture looks like. The user specifies their data model by uploading schema into the database via the schema server. They then can upload a listener file to define events that will generate notifications. The frontend app can now send requests to the PostgREST server and subscribe to notifications via the event server using the “/realtime” endpoint.
Performance
We load-tested the real-time capability of a locally run instance of Snowclone using Gatling's SSE tool.
For an acceptable performance threshold, we chose a 95th percentile response time of 250 ms for SSEs from our realtime server. This number is based on the finding that 250 ms is the average human reaction time. 1
We ramped up to 13,500 users by adding 450 users per second over 30 seconds, without server performance degrading beyond acceptable. Each test user's SSE connection persisted for 3 minutes before closing. Within that span, each test user received an SSE message upon connection to our “/realtime” path followed by an SSE message every 5 seconds.
Security
Authentication and Authorization
Our next challenge was API security. PostgREST takes a database-centric view towards security, meaning that it only handles authentication (”you are who you say you are”), and pushes authorization (”you have certain permissions”) down to the database level.
Roles
PostgREST requires three “roles” to be defined at the database level: authenticator, user, and anonymous. These roles can be thought of as categories. The authenticator role is used solely for connecting to the database to perform the authentication process and has no other permissions. The user role is granted upon successful authentication and includes permissions to read, write, update, and delete items via the API. The anonymous role is granted upon failed authentication and has no privileges.

The authentication process uses Postgres' SET ROLE statement to perform user impersonation.
User
impersonation is the method by which the “authenticator” role switches into either the “user” or “anonymous”
role depending on whether authentication succeeds.
JWT Authentication
PostgREST authentication uses JSON Web Tokens (JWT). A JWT is cryptographically generated by combining a header (containing the hashing algorithm), a data payload, and a secret signature (to encode the token).
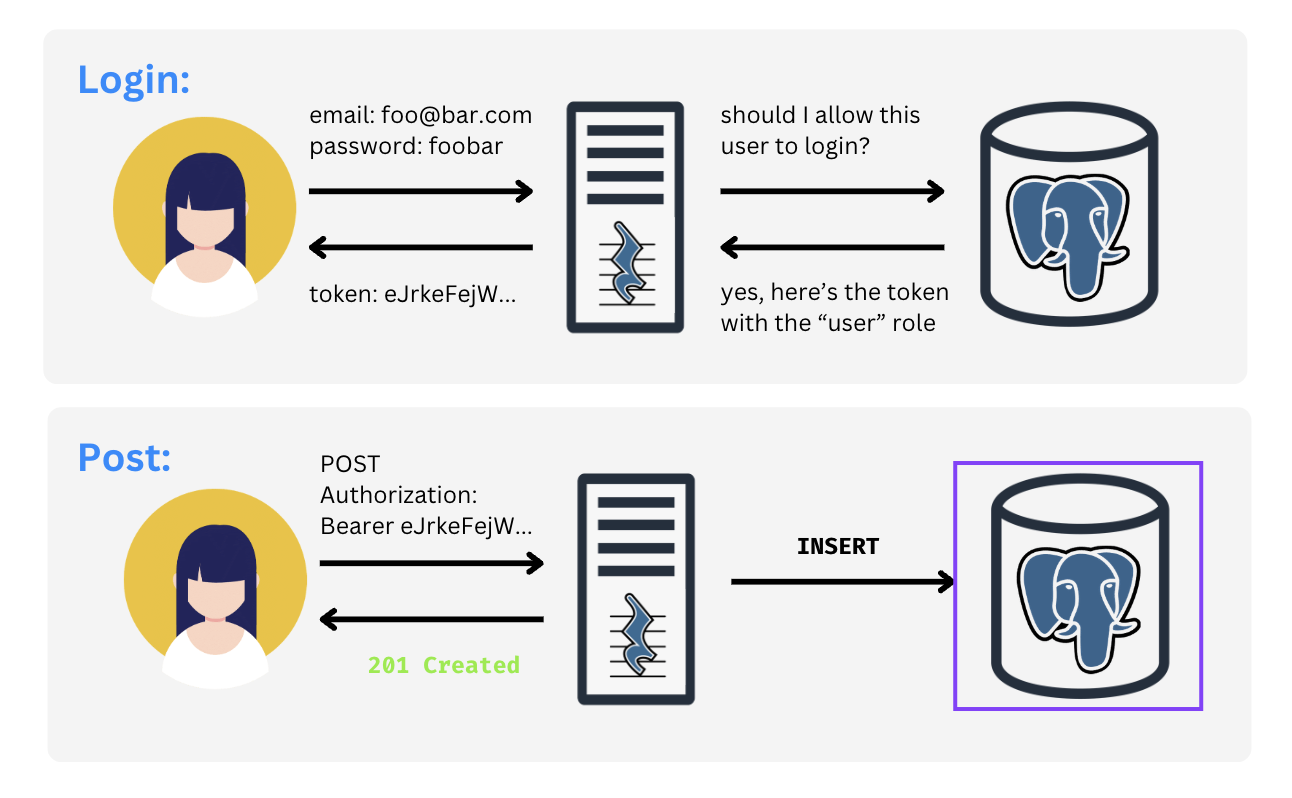
When an incoming HTTP request to the PostgREST server contains a JWT with a valid “role” in its payload (in this case, “user”), PostgREST will switch to the database role with that name for the duration of the HTTP request. If the request does not contain a JWT or contains a JWT without a role that has been defined in the database, PostgREST will switch to the “anonymous” role.
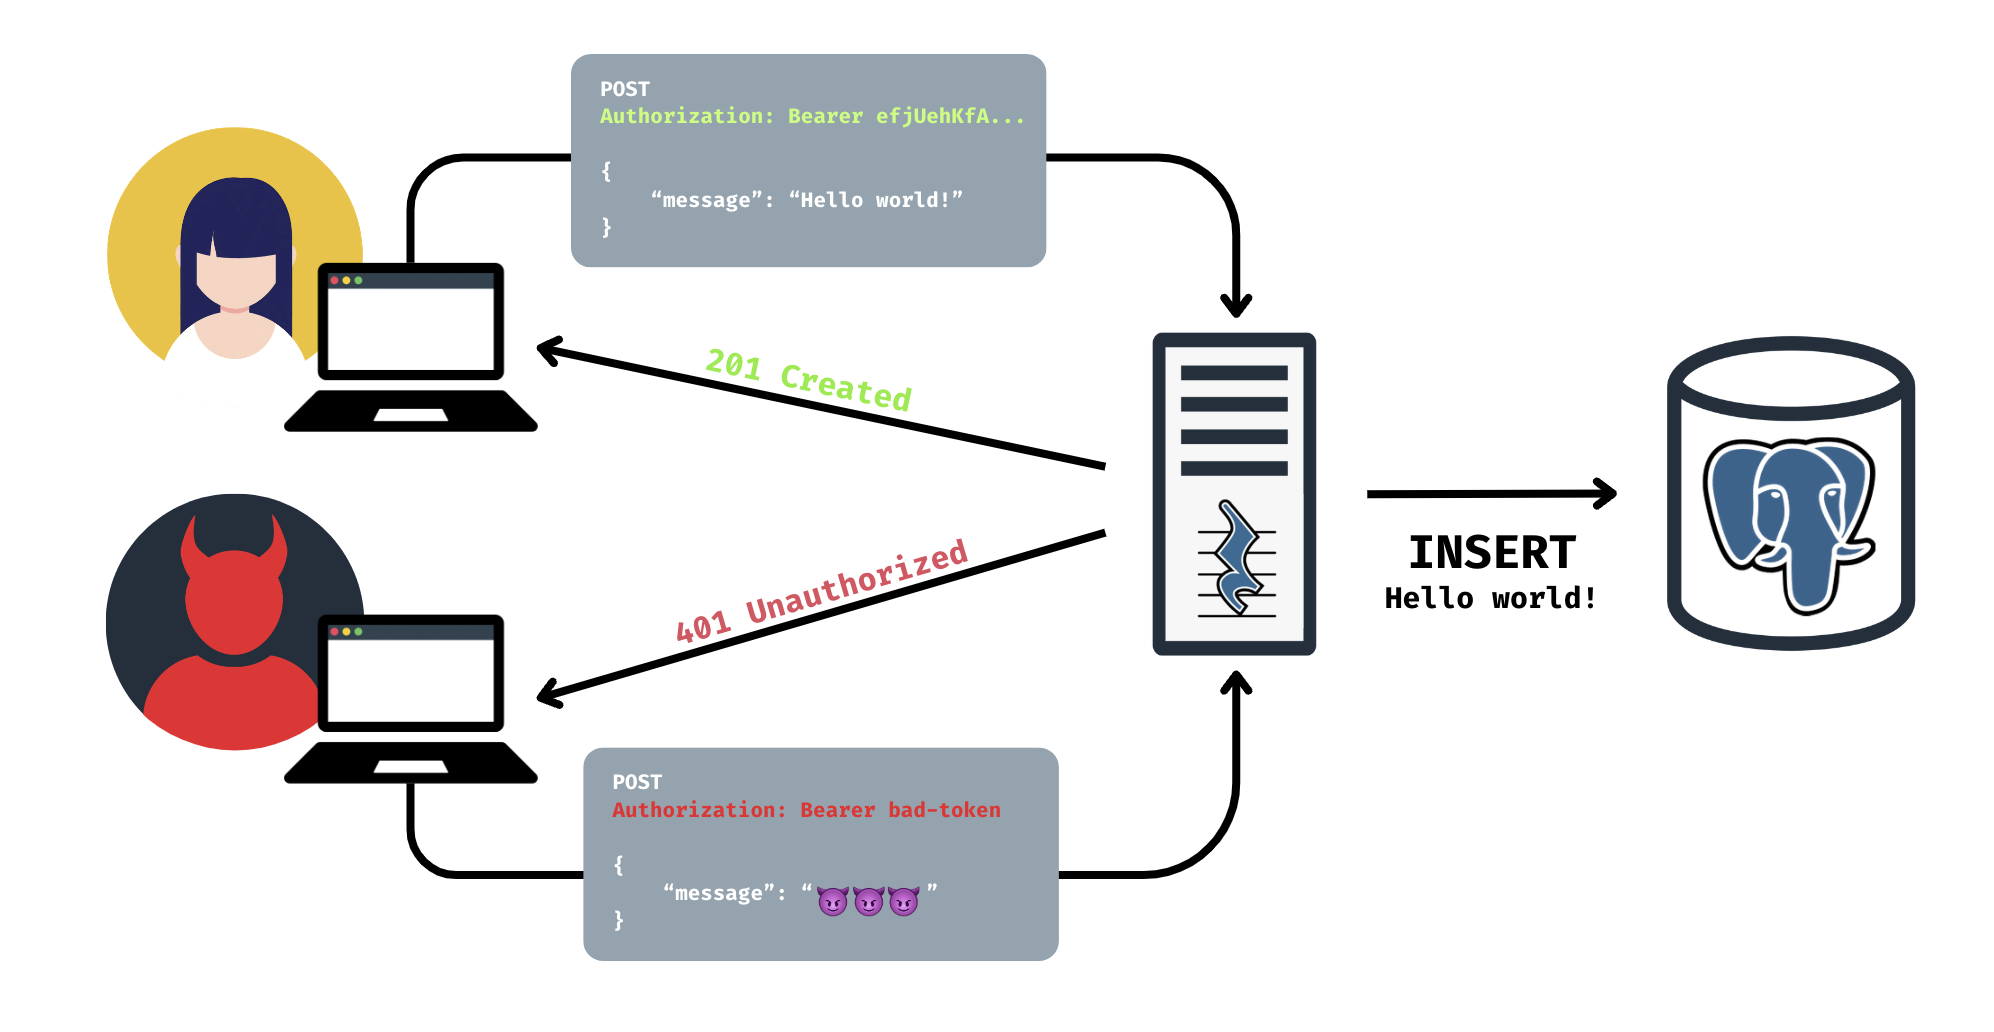
In the below example, since only the “user” role is allowed to INSERT into the messages table,
the HTTP
request to PostgREST must contain an authentication header with a JWT containing the “user” role. Otherwise,
the request is unauthorized.
Role Creation
Since PostgREST only handles authentication, we needed to define the three roles and their corresponding permissions at the database level. In practice, this problem was very similar to the need for uploading schema files to the database for PostgREST to generate API endpoints.
Since we already had the schema server, we could ask our users to upload a .sql file containing the commands to define and alter the privileges for database roles. That would give them maximum flexibility in how to define those roles (for example, they could expand beyond the three basic roles and create finer-grained roles for members with access to only certain parts of the database).
However, since our design goal was to make configuration easy, we created a boilerplate file, “apiSchema.sql” containing the necessary commands to create and grant privileges for the three generic roles (authenticator, anonymous, and user). Then, we modified the Postgres Dockerfile such that it ran that file upon initialization of the Postgres database. That way, Snowclone provides usable database authentication out of the box, with the option to further customize security settings by uploading additional files to the schema server.
User Logins
Finally, we needed to implement user logins. A user logs in with a valid username and password, and they receive back an automatically-generated JWT with the “user” role which they can then use to authenticate with PostgREST.
Rather than using an external service, such as Auth0, to provide user management and coordinate with the PostgREST server, we decided to use Postgres' capabilities to support logins entirely through SQL. We did this to minimize our technology “surface area” and leverage Postgres to be the workhorse of our tech stack.
To accomplish this, we created, “logins.sql” another file that runs upon database initialization. The file contains the commands to do the following:
-
Create a separate
basic_authschema not exposed publicly in the PostgREST API -
Create a
userstable with “email”, “password”, and “role” columns -
Create an
encrypt_passfunction to encrypt passwords stored in the “users” table usingpgcryptohashing functions -
Create a
user_rolefunction that checks a password against the encrypted column and returns a “user” role upon receiving a correct email and password -
Create a
loginfunction that generates a JWT in response to a successful login (ie. theuser_rolefunction checked the password and returned a valid role)
From there, PostgREST provides an endpoint, /rpc/login where users can send an HTTP POST
request with their
email and password, and receive back a JWT generated by the login function. The front-end app
code can then
store this JWT as a cookie in the user's browser such that HTTP requests coming from that browser will have
the JWT added in the authentication header.
